SAP Finance- Silver

SAP FINANCE-SILVER

SAP Money Market Tutorial

SAP Money Market

Money market transactions are used for short- and medium-term Investments and for borrowing of funds. Key money market instruments are as listed below:

  • Fixed Term Deposit
  • Commercial papers
  • Deposit at Notice
  • Interest rate Instruments

Fixed term Deposits

A Fixed term deposit is an investment that includes the deposit of money into an account at a financial institution. Term deposit investments usually carry short-term maturities ranging from one month to a few years. Investors can withdraw funds only at the end of term

Commercial Papers

A Commercial paper is an unsecured, short-term debt instrument issued by a company for the financing of accounts payable and inventories and meet short-term liabilities. Commercial paper is usually issued at a discount from face value and reflects prevailing market interest rates

Deposits at Notice

These investments are similar to fixed term deposit. However, money can be withdrawn only after advance notice period has expired. For e.g. If you have a 50-day notice deposit account, you ca withdraw money only after 50 day withdrawal notice period has expired

Interest rate Instruments

An interest-rate instrument is a derivative where the underlying asset is the right to pay or receive a notional amount of money at a given interest rate. Its value increase / decrease based on movement of the interest rate

In this tutorial we will discuss SAP business process, configuration, master data setup and end user transactions codes / testing of Money market instrument (Fixed term deposit)

Configuration steps – Money Market Instruments

Activate Treasury Functions in SAP

Path: SPRO- Activate business functions – Continue – Enterprise Business functions -Activate below functions

  • FIN_TRM_LR_FI_AN
  • FIN_TRM_LR_FI_AN2

Activate Business Function

Define Product Type Path

Explanation

Product types help to differentiate between different Money Market financial instruments. In Money Market area, the following product categories are available in standard SAP

  • 510 Fixed-term deposits
  • 520 Deposits at notice
  • 530 Commercial Paper
  • 540 Cash flow transaction
  • 550 Interest rate instruments

Product type 510 is used for fixed term deposits. We will configure a new product type 51G, which will be a fixed term deposit to understand various configuration steps in SAP

Path: Financial Supply Chain Management- Treasury and Risk management – Transaction Manager – Money Market – Transaction Management – Product Type – Define Product Type

You can create it by copying SAP standard product type 51A for Fixed term Deposit
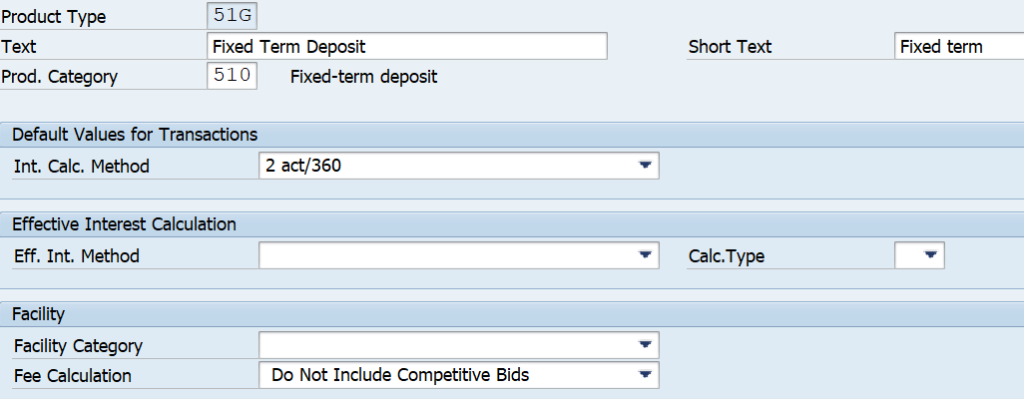
TR Fixed Deposit

Define Number Ranges

Path: Financial Supply Chain Management- Treasury and Risk management – Transaction Manager – Money Market – Transaction Management – Transaction Type – Define Number Ranges

Treasury Number Range

Define Transaction Types

Explanation: Transaction Type is assigned to a Product Type. Transaction Type define the direction of the Trade. For Product Type 51G, we can use Transaction Type used by 51A as below

Path: Financial Supply Chain Management- Treasury and Risk management – Transaction Manager – Money Market – Transaction Management – Transaction Type- Define Transaction Type

Transaction Type for Fixed Term Investment - 100

 Transaction Type for Fixed term Borrowing -200

Money Market Product Type

Define Flow Types

Explanation

Flow types represent different types of flows related to Fixed Term instruments. We will use the SAP standard Flow types used for product type 51A for our product type 51G. These are listed below

Path: Financial Supply Chain Management- Treasury and Risk management – Transaction Manager – Money Market – Transaction Management – Flow Types- Define Flow Types

Product Type Description TType Transaction SAP Std. Flow Type Flow Type name
51A Fix Term Dep 100 Investment 1100 Principal Increase
51A Fix Term Dep 100 Investment 1110 Principal Decrease
51A Fix Term Dep 100 Investment 1120 Final Repayment
51A Fix Term Dep 100 Investment 1150 Interest Capitalization
51A Fix Term Dep 100 Investment 1901 Charges
51A Fix Term Dep 100 Investment 1905 Withholding tax 1
51A Fix Term Dep 200 Borrowing 1105 Borrowing / Increase
51A Fix Term Dep 200 Borrowing 1110 Borrowing Decrease
51A Fix Term Dep 200 Borrowing 1120 Final Repayment
51A Fix Term Dep 200 Borrowing 1150 Interest Capitalization
51A Fix Term Dep 200 Borrowing 1901 Charges

Uses of SAP Treasury Payment Program

Assign Flow Types to Transaction Types

Path: Financial Supply Chain Management- Treasury and Risk management – Transaction Manager – Money Market – Transaction Management – Flow Types- Assign Flow Types to Transaction Types

This content is for SAP FINANCE-Silver members only.
Register
Already a member? Log in here

SAP Money Market Tutorial Read More »

SAP AR Business User Guide

Accounts Receivable- Business User Guide

In contrast to general ledger accounting in which you only manage the total of receivables for the financial statement, you use accounts receivable accounting for recording all details regarding the business transactions such as invoices, credit memos and incoming payments. The interaction between the sales department and accounts receivable accounting assumes a significant role here. The sales employees are interested in sales orders and sales volume and they receive incentives in the form of bonus payments for their work. The task of accounts receivable accounting is to convert the invoice amount that was agreed on by contract with the customer into cash receipt. There is a general saying that states "sold and delivered goods remain a gift until they are paid".

The management will include rules to handle certain business cases for example how to handle insolvency of one or more customers or total loss in receivables, or if customers are paying too late or don't pay the total invoice amount, these all result in delayed or loss in the cash receipt, however the management must keep the business running. A key figure that is mentioned in business is the DSO (days sales outstanding) value, that is the period outstanding of receivables. Another addition to management is how much time and hence money is invested internally to go from sales order to cash receipt, this determined how well sales and financial account interact with each other, this calls for very clear responsibilities and goals.

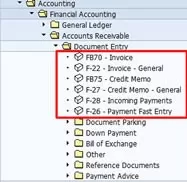
I will not be mentioning on how to enter incoming invoices in this section as they are the same as in accounts payable, the only different is the transactions codes and the easy access menu location which can be seen below, which means we can focus on the sections that are related to the account receivable.

FB70

FI-AR Component

The SAP system includes two components or subledger's to save customer data

  • FI-AR (accounts receivable)
  • FI-CA (contract accounting)

This dualism is due to that enterprises use different business models - business to business (B2B) and business to consumer (B2C) in practice. The B2C business model primary concerns SAP industry solutions for communication enterprises, electricity provides and the media segment. One challenge is to map millions of end customers quickly and efficiently, the data model and the existing programs for FI-AR quickly reach their (time) limits. This is where FI-CA (contract accounting) emerged, which is based on the industry solutions for mass accounting. The processes and hence the programs such as invoice posting, dunning procedures or incoming payments are developed for these industries specifically for the FI-CA subledger. FI-AR and the general ledger are connected in real time, however they are connected asynchronously that is they are connected to the background processing with a time delay.

The FI-AR component keeps and manages account-based customer data, the component is an integral part of sales and distribution controlling, it also provides effective credit management through a close integration with SD (Sales and Distribution) module and information for the optimization of the liquidity planning through a connection with the cash management and forecast.

Account analyses, alarm reports, due date lists and flexible dunning are available for the open item management, an incoming payment can be assigned to the corresponding receivables manually on the screen or by electronic means. By means of the payment program you can automate both the debit memo procedure and the payment of credit memos. To document the processes in accounts receivable accounting you can use account balances, journals, balance audit trails and numerous standard reports. For key date valuations you revaluate foreign currency items, determine customers on the credit side and scan the balances established this way for remaining terms.

SAP AR Master Data

Master data is made of three parts, the general data is maintained at the client level, this data is available for all company codes, at this level you specify the name of the subledger account in subledger accounting, the tax number and the bank details.

Next is the company code data, this includes the account number of the reconciliation account in the general ledger, the terms of payment and the settings for the dunning procedure. For integrated use with the SD module you are provided with additional fields for the customers master record, these fields contain information that is required for handling business transactions in the sales and distribution area and that is used exclusively in the SD module, the data includes terms of delivery, price list type and remarks regarding the customer, these specifications control the order processing, the shipping data and the billing information provided that these business transaction are recorded by means of a transaction to SD. I will be fully covering sales and distribution in another section.

The SAP system provides a special master record type for one-time customers, in contrast to the regular master records, this is similar to the accounts payable, the master record does not contain specific data of the business partner such as address or bank details. The information is entered for each business transaction during document entry. When posting to a one-time account the system automatically navigates to an entry screen to enter the business partners specific data.

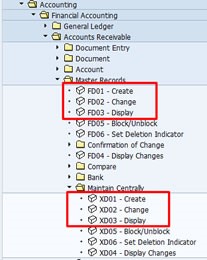
Creating a customer is very similar to creating a vendor which we performed in the accounts payable section, you can either create a customer centrally or create it centrally/company code level, the below screenshot displays both methods, we will use transaction code FD01

FD03

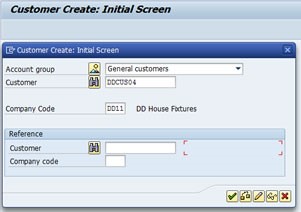
The initial screen requests for a account group, customer name and the company code, the account determines the account numbering or lettering and the field status parameters. here I will just enter the minimum to get started, also if you notice you can copy an existing account using the reference fields.

FD01

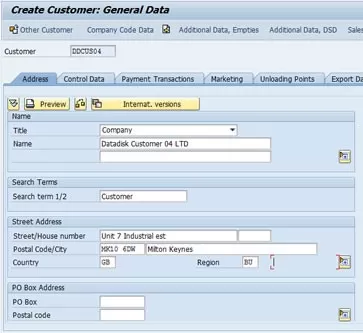
The first details we will fill in is the address tab (left-hand screenshot), this is all self-explaining, the next screen/tab is the control data (right-hand screenshot), here we can enter tax details, locations (this help in SD for delivery locations, etc.), you can also specify if the customer is also a vendor (if you do then a field called Clearing with ... in the account management tab in the company code will appear, you need to activate this field), and you can implement authorizations so that specific users can alter the customers details.

Customer Master Data

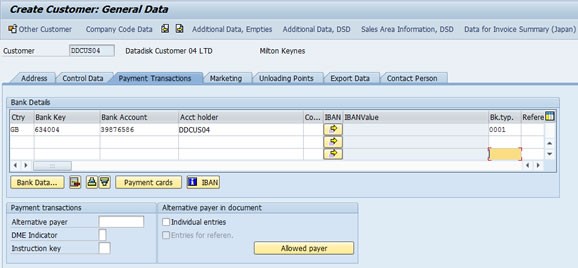
The next screen is the bank details (left-hand screenshot) again this is self-explaining, the account management screen (right-hand screenshot) details the reconciliation account (remember the customer is a subledger), sort key, cash management group, also you can setup the interest calculation parameters, below are some of the parameters for the account management screen

  • reconciliation account - Each posting to an account of subledger accounting automatically creates an entry to the general ledger, this is done via the reconciliation account, the field status group in the master record of the reconciliation account specifies the screen layout for document entry. The items of the customer’s account are managed in the currency of the reconciliation account
  • sort key - used to sort line items, normally line items are sorted using the assignment field in the document.
  • authorization - specify who receives change or read authorization for this account

Customer Bank Details

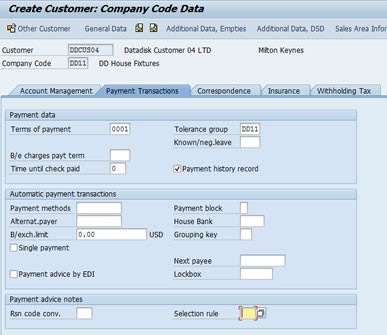
Next, we fill in the details for the payment transactions here we have the payment terms, tolerance group, automatic payment transactions

  • Terms of payment - is used for orders, purchase orders and invoices and provide information about dunning and payment transactions, the value entered here is used as a default value for the document entry
  • Tolerance group - you make specifications for granting of cash discounts and for handling of payment differences for each tolerance group, this entry affects dunning and entry of payment transactions. For manual closing the payment differences are accepted by the system up to the define tolerance and the items are closed
  • Payment history record - the system records the customer payment history, this is important for credit management.
  • Payment methods - you can define the payment methods that are allowed for the customer if the automatic payment program is used.
  • Payment block - this causes a block on the account, in the automatic payment program the block is effective if it is set either in the master record or in the document, if set in the master record all open items of this customer are transferred to the exception list.
  • Single payment - determines that all open items are paid or collected separately, this prevents multiple open items being cleared jointly with one payment.
  • Clearing with vendor - this checkbox only appears if a value is entered in the vendor field in the control data tab, however an actual clearing within the automatic SAP procedure only takes place if this field is selected

Customer Master data

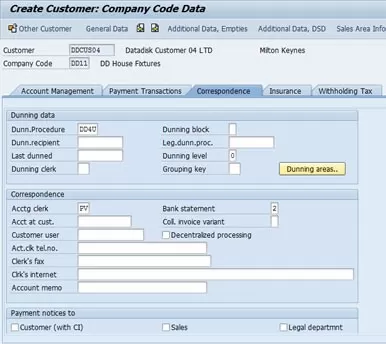
Next is the correspondence screen which involves dunning, the accounting clerk, bank statements, etc.

  • Dunning procedure - the dunning procedure which is company code independent and can be used by all company codes within a client. Only the dunning notices are controlled separately for each company code. To be consider as part of the dunning process you must define a procedure here.
  • Dunning Frequency/Interval - determines the minimum number of days that must elapse after a dunning run before an account can be dunned again. The date of the last dunning run is recorded in the master record, using this date and the frequency/interval the SAP can determine if it is available to be in the dunning run.
  • Grace day/minimum number of days in arrears - used to determine the due date of open items and whether an account can be dunned. An item whose days in arrears are smaller or equal to the grace days must be considered as not due.
  • Number of dunning levels - for each dunning level you can specify how many days in arrears a line item must be to reach the corresponding dunning level. The dunning level determines the associated dunning notice.
  • Processes to be dunned - you specify whether the stand and/or special G/L transactions are dunned with a procedure, special G/L transaction include bill of exchange payment request, payment requests, down payments and down payment requests.
  • Dunning block - the business partner is not included in the dunning run, you can enter a blocking key which is a descriptive text that indicates the reason for the block, blocked accounts are output in an exception list which includes the block reason.
  • Dunning level - normally this is set within the dunning program, however you can set it here, the dunning level influences the next dunning run, if set to 0 the system uses the minimum number of days in arrears that are specified in the dunning procedure to calculate the necessary days in arrears for all other dunning levels the system uses grace days
  • Dunning clerk - the name of the clerk whose ID is indicated in this field is printed on the dunning notices, the dunning and account clerks can be same of different
  • Accounting clerk - the name of the clerk whose ID is indicated in this field appears on all correspondence documents sent to the business partner, additionally it is printed on the dunning notices, if the dunning clerk field is blank

Customer Master-Dunning

The customer will now be available for you to post invoices, etc.

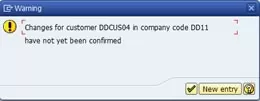
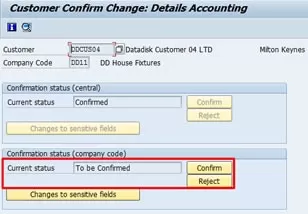
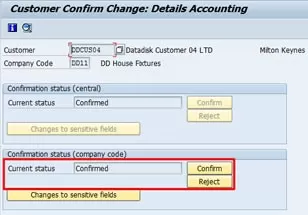
If you display the customer and you receive the below informational message (left-hand screenshot) this means you need to confirm the customer (you need to be a different user), from the display screen select extras -> confirmation of change from the menu bar and you will be taken to the customer confirm change screen (middle screenshot), if you notice in the confirmation status (company code) it needs to be confirmed, select the confirm button and the screen will be updated, you will then not see this message again.

SAP sensitive field functionality

Customer Master sensitive field

Customer master Sensitive field functionality

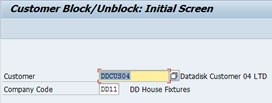
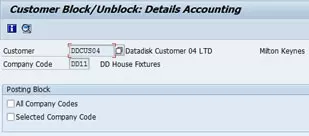
As in vendors you can block customers, using transaction code FD05 the initial screen (left-hand screenshot) requests for the customer name and company code, you can block for all company codes or just the selected company code. You can also do this centrally using transaction code XD05.

Customer master Block

Customer master block

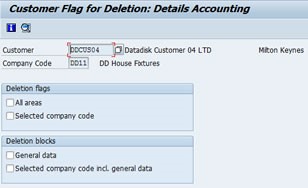
The subledger's provide you the option to set flags for the deletion of all master data or company code specific master data of certain company codes, you can use transaction code FD06

  • General data - this flag prevents the deletion of general data from the master record by archiving the program
  • Selected company code Inc. general data - this flag you determine the company-specific data of the master record must not be deleted, if set none of the associated general data is deleted.


Overview of the Integrated Business Transaction

Like we did in the accounts payable I am going to explain the business transactions relating to account receivable, this usually concerns the individual steps from order entry to incoming payments (order to cash), again different departments will be involved, departments of sales and distribution, accounts receivable accounting, controlling, and treasury.

During the incoming orders in the sales and distribution department two critical checks are implemented in the background

  • can the goods be delivered at the requested date
  • does the customer have a sufficient credit limit

Both may require interaction with the customer, a successful incoming order impacts the future cash inflow of an enterprise, with the date of required payment you are provided with a date for the planned cash receipt, this is significant for the treasury department. The controlling department can identify planned revenues for products x, y, and z, already in the forecasts by means of the incoming orders.

In real life the next steps of the process chain, the goods issue, is carried out days, weeks or even months after the incoming order, at this time the goods are removed from storage and delivered to the customer, again credit checks may be performed just before the goods are sent. The next step is the billing documents for the delivery and services provided as a receivable in the accounts receivable accounting. The customer is requested to pay within the time period that was agreed on the incoming orders, at the same time this information is forwarded onto the controlling and treasury departments. The billing status is much more meaningful that the incoming order status for a profitability analysis of products x, y and z for a liquidity planning. At this point the order is processed, the goods are delivered and the billing brings in the cash receipt closer.

There is a saying as in accounts payable that "delivered goods remain a gift until they are paid", a customer will receive written dunning notices in multiple dunning levels after the date of required payment has been reached. In practice you use three or four dunning levels with dunning intervals of 7 to 14 days, however customers (not all customers) normally delay payment until they receive the third or last dunning notice. Dunning can be performed by email and by telephone where you would call the customer to remind them at the payment is due, plus this adds the bonus that you can ask them if they are satisfied with anything or if you can help them with more services, almost trying to obtain additional sales without being too demanding but using the justification of the dunning notice for the call.

The final step of the process chain takes place when the customer pays, the payment is credited to the enterprise account, and the information is available via an electronic bank statement. Payment notes indicate which bills are supposed to be paid with the cash receipt, these notes are used for an automatic clearing of the original bill, however there may be times which manual intervention is required to match the payment with the order.


Monitoring Credit Limits

It is important to monitor the credit lines of customers, credit checks are performed and goods/services are not performed or sent until clarification has been obtained with the customer for the credit limit breaches, it maybe that credit limits can be increased or that they customer will pay over the phone to reduce the amount of credit they have. Over time credit limits will match what the customer needs and hopefully there will not be too many issues, as the last thing that you want to do is make the customer go else where for the goods or services but at the same time you need to make sure that orders are being paid on a reasonable timescale.

The SAP credit management system allows you to keep the history on each customer in one place, this includes payment history, dunning levels and order volumes and external information regarding credit ratings.

When you enter a order (transaction code VA01) or invoice (transaction code FB70) the system will check and alert if any credit limit (right-hand screenshot) is breached or if a clerk does not have the limits to input the invoice (left-hand screenshot), you can see how to create credit limit areas in the FI setup and configuration section.

Dispute Management

I will cover the dispute management lightly here until I get more experience with it, all businesses have to deal with disputes with customers and vendors, and they can be divided into three categories

  • The customer informs the enterprise proactively - the complaints department, the account manager and accounting must all be able to initiate a dispute case
  • The customer claims payment deductions - the SAP system unsuccessfully tries to settle a number of invoices by means of a electronic bank statement. The dispute management can automatically generate a dispute case with the associated items, indicate difference and forward it to the clerk defined in the customer master record.
  • The customer hold backs the payment - the open items become over due after the terms of payment have expired, a dispute case can be created automatically before the dunning notice.

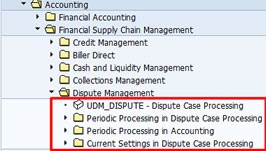
The dispute case created remains connected to the open items or the business transaction, you can open the dispute case processing from the SAP menu as seen below

SAP Dispute Management

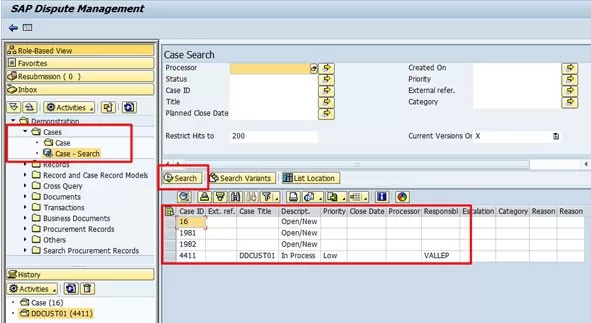
When you open the dispute management you are taken to the initial screen as per the below screenshot (left-hand screenshot), I have highlighted in red boxes some simple search options that you can use to find open cases, also you have different RMS (Record Management Systems) which are used for the logical separation of different business areas (right-hand screenshot), which are physically used in the same client of an installation. By dividing the records of a company into discreet units means that it is possible to provide particular groups of users access to particular records.

SAP Dispute management

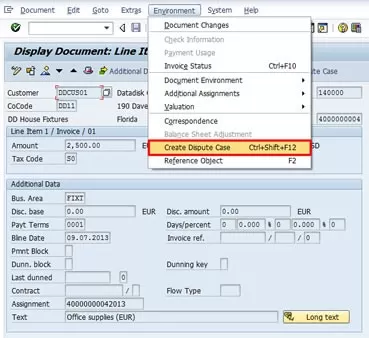
So lets create a dispute case with a existing transaction, for this example I will use customer DDCUS01 and select a open transaction, you can then select environment -> create dispute case

SAP Dispute Management

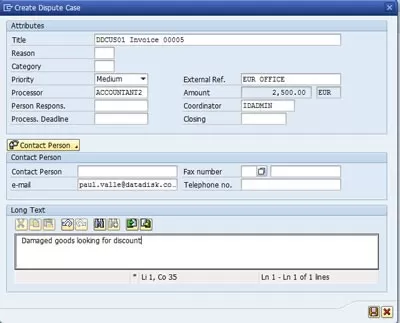
The dispute case initial screen looks like below, fill in as much as you can and then select the save icon

SAP Dispute Management

The SAP system then displays a confirmation message that a dispute has been opened for this document.

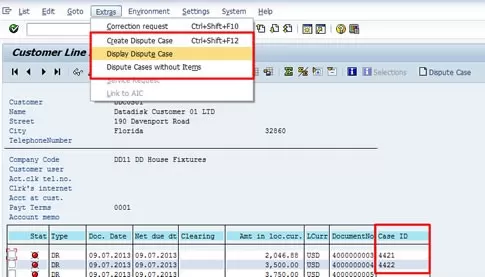
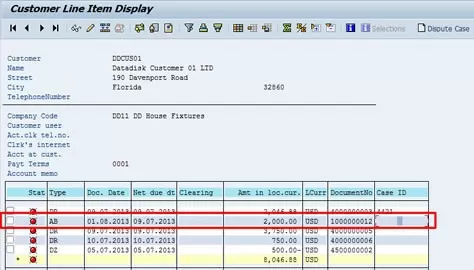
You can add an additional column called case ID in the customer line item display screen, which displays the dispute case id for all the documents, you can either double-click the case ID or select extras -> display dispute case to see the dispute case

SAP Dispute Management

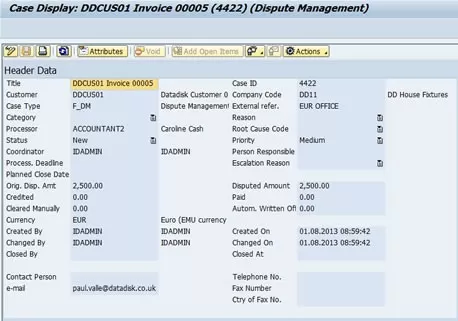
The system then displays a list of the dispute cases, again you can double-click on the dispute case to see the header information

SAP Dispute Management

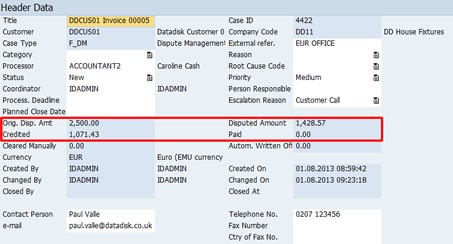
The dispute case header information has lots of details which includes who opened the case, the amounts involved, contact details, reasons for dispute case, etc. Notice the amount as we will be creating a credit memo later and linking to this dispute case

SAP Dispute Management

We can then use the dispute case manager to also view dispute cases as we saw earlier, here you can see the two cases that I have open (including the one we created earlier)

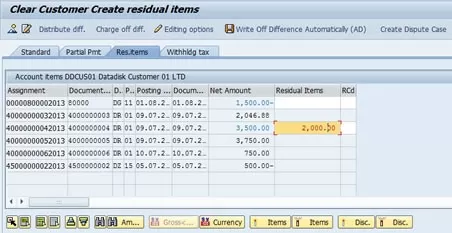
Let’s say that we have agreed to create a credit memo for 1500.00 for the damaged goods (something is better than nothing), once the credit memo has been created we use clearing to make a residual payment against the original invoice

Dispute Management

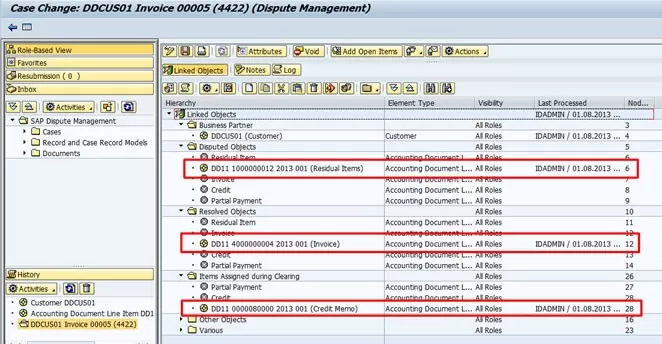
Now lets see what has happened in the dispute manager, here we can see three entries, the original invoice, the credit memo and the residual item, so the dispute manager knows what has happened, the original invoice has now been resolved but because we still have the dispute case open it has attached to the residual item. You can double-click any of the below line items to obtain more details.

SAP Dispute Management

If we look at the header, we can see that the amounts have been adjusted because a credit memo has been applied

SAP Dispute Management

Finally, you can close the dispute case by either paying the invoice and clearing the open item or by using the dispute header and selecting the void button, you can then see the closed by completed (left-hand screenshot), also if you look at the open item the case ID has been removed (right-hand screenshot)

FBL5N

This content is for SAP FINANCE-Silver members only.
Register
Already a member? Log in here

SAP AR Business User Guide Read More »

SAP iDoc

SAP iDoc

In this tutorial we will discuss in detail, sap iDoc functionality, it’s uses, idoc configuration and customizing in SAP. We will discuss the below SAP iDoc topics

  1. What is an iDoc
  2. Configure Outbound iDoc in sap
  3. Create Logical System
  4. Create RFC destination
  5. Maintain Ports
  6. Create Partner Profile for outbound iDoc in sap
  7. Create Distribution model and filters in sap
  8. sap iDoc Segment filters
  9. Send full and delta load of Vendor master iDoc
  10. Display and Edit iDoc
  11. Create Partner Profile for inbound iDoc

  12. Test inbound iDoc in SAP

  13. Create Partner profile for outbound iDoc-Audit Confirmations
  14. Display and Edit iDoc
  15. Create an Extended / Custom iDoc in SAP

  16. Test extended iDoc in SAP

Need for a sap iDoc

sap iDoc is used by companies running on SAP ERP to exchange data with other companies who could be their vendors, customers, banks, Non SAP application processing company data and than feeding it into it’s SAP ERP.

What is an Idoc in sap : IDoc is an SAP object ( A type of file format) that carries data of a business transaction from one system to another in the form of electronic message. IDoc is an acronym for Intermediate Document. The purpose of an IDoc is to transfer data or information from SAP to other systems, which could be SAP or Non SAP and vice versa.

iDoc is transferred from SAP to another SAP system using SAP’s ALE technology.

SAP iDoc transafer using ALE

Outbound iDoc in sap

An outbound iDoc is triggered in SAP. From SAP it goes to middleware which could be EDI system or Muelsoft or any other middleware system. In case the receiving system is a non SAP system Middleware transform the iDoc into an XML / flat file and feeds it into the receiving system.

In case the other system is SAP iDoc is sent to other system through transactional RFC connection between the two SAP systems. We will discuss all these is details along with their set in SAP later in this article. E.g. of outbound iDoc could be sent customer master data from SAP to other applications, Vendor master data, Material master data etc.

Inbound iDoc in sap

This iDoc is generated outside of receiving SAP system. Middleware system like EDI / Mulesoft receive the inbound data which could be in the flat file, xml format. This is than transformed into iDoc format by the middleware system. This iDoc is than sent to receiving SAP system. SAP system process the iDoc and post documents in SAP

Inbound iDoc overview

Configuring Outbound iDoc in SAP 

SAP has different iDoc types for different purposes. Here we will configure Customer master outbound iDoc type. Below are some of the iDoc types:

Product Type Desc. TType Transaction SAP Std. Flow Type Flow Type name
iDoc Purpose iDoc Type
Send Customer master data DEBMAS
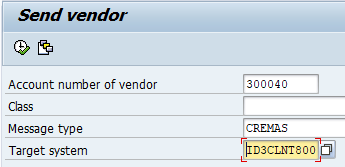
Send Vendor Master data CREMAS
Send Material master data MATMAS

Below steps are involved in setting up outbound iDoc in SAP

  1. Create Logical System
  2. Create RFC Destination
  3. Allocate Logical System to Client
  4. Maintain Ports
  5. Create Partner Profile
  6. Create Distribution Model and Filter
  7. iDoc Segment Filtering
  8. Enable Change Pointer
  9. Enable Change pointer for specific message type
  10. Create iDoc from change pointer
  11. Send full customer master data through iDoc

Create Logical System in Sending System 

A 'logical system' is used to identify an individual client in a system, for ALE communication between SAP systems.

Login to Client 105 (SENDER SYSTEM)

Transaction code : BD54

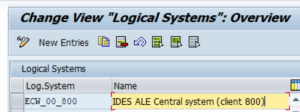
Create Logical Systems with naming convention 'system name'+'CLNT'+client no . E.g:  ECW_00_800

Create Logical Systems with naming convention 'system name'+'CLNT'+client no ex: example for receiving system e.g.:  ID3CLNT800

Save and come back

Receiving Logical system
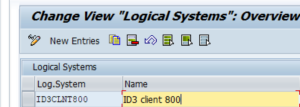
Receiving Logical System

Sending Logical System

Sending Logical System

Log on to SAP system, client 105

Transaction : SALE – Logical System – Assign Logical System to client

Assign client 800 to Logical system ECW_00_800
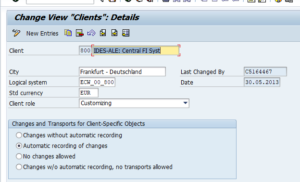
Assign client 800 to Logical system

Create Logical System in Receiving System

Login to Client 800 (RECEIVING SYSTEM)

Transaction code : BD54

Create Logical Systems with naming convention 'system name'+'CLNT'+client no ex: example for receiving system e.g.:  ID3CLNT800

Save and come back
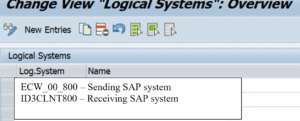
Logical System in Receiving system

Assign Logical System to client in Receiving System 

Log on to SAP system, client 800

Transaction : SALE – Logical System – Assign Logical System to client

Assign client 800 to Logical system ID3CLNT800

Create RFC Destination in sap

Transaction : SM59

The information about the target system of an RFC call is stored in the RFC destination. The attributes of destinations are defined statically and managed in AS ABAP using the transaction SM59. Every destination managed in transaction SM59 has a unique name that can be specified after the addition DESTINATION in RFC
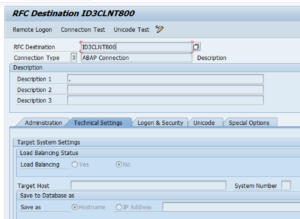
RFC Destination

Maintain Ports 

Go to transaction WE21

Select folder Transactional RFC

Click create and select generate port name

In the RFC destination field give the Receiving system (ID3CLNT800) created earlier in transaction BD54
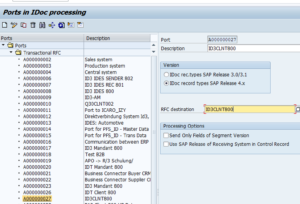
Maintain Ports

Please note an iDoc can be created in 3 formats

  • Transactional RFC
  • XML file
  • Flat file

Transactional RFC : This for real time transfer of data from one SAP system to another SAP system

XML File : Here the iDoc is created in an XML file format. If XML file format iDoc is required select folder XML in transaction WE21 and then specify the receiving system port. In this we have to also specify a location in share point where the XML file will be delivered by the sending system. Receiving system will pick the file from the location specified here.
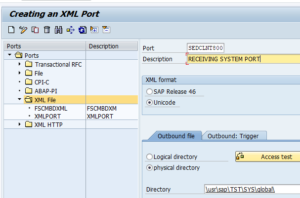
Create XML Port

Flat file iDoc : Similar to XML file. Only difference it is txt file format


Create Partner Profile in sap

 Transaction code - WE20

This has to be configured separately for different iDoc types. Here we will set it up for outbound iDoc type Vendor Master (CREMAS)

Select folder LS (Logical System) – Now click the create button

In the Partner Number field enter the receiving system created earlier

In the outbound Parameters click the plus sign
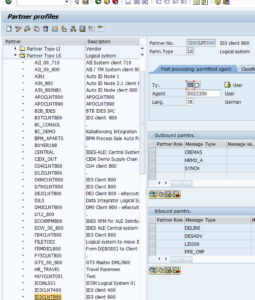
Partner Profile

In the next screen enter iDoc message type CREMAS and other details as shown below
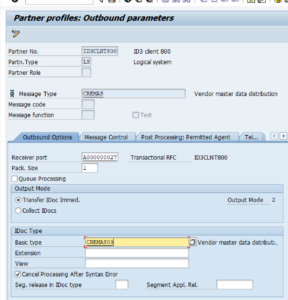
Partner profile

Create Distribution Model and Filters

Transaction Code : BD64

Click create model view. Give a name to your model, say AUMTECH, Save
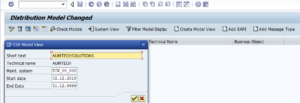
Distribution model

Now select the model (AUMTECH) and click create message on header.

Enter the details as show below and save.

Distribution model


Adding Distribution Filters

Transaction code : BD64

Select the model created above. Now click on No filter Set as shown below.

Than click on create filter set. After that you can select specific fields as filter. For e.g. field company code can be used as a filter. It there are company code 100, 200, 300, 400 etc. and you select company code 100 in the filter. In that case vendor master data for company codes other than 100 only will be sent

iDoc Segment Filtering

Transaction code : BD56

An iDoc is made up of many segments. These segments are buckets which contain fields. Fields have the value. Below we list Vendor master iDoc (CREMAS) segments. Go to transaction WE19 and enter the iDoc message type. In this case CREMAS. Here you will be able to see all iDoc segments as shown below
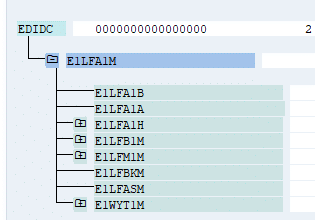
iDoc Segment filtering

To see the fields in a segment enter the segment in SE11

iDoc-15
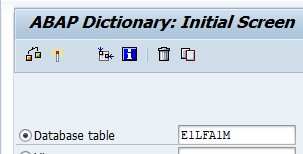
iDoc segment fields

Another segment - E1LFBKM

This iDoc segment has vendor bank details. You may not want to send vendor details to other system. For this in transaction BD56 remove the idoc segments which should not sent

Enable change pointers

Transaction code : BD61
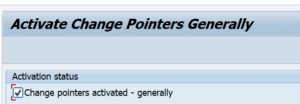
iDoc change pointers

Change Pointers

Enable Change Pointers for specific message type

Transaction code : BD50

As we are sending out Vendor master data through iDoc, message type is CREMAS. So enable change pointer for CREMAS

iDoc20

Activate change pointers

Transaction code : BD14

iDoc-21

Send outbound iDoc

Transaction code : BD21

iDoc-22

Create iDoc

Display and Edit SAP iDoc

Transaction code : WE02
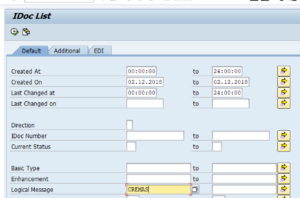
Display and Edit iDoc

Display and edit iDoc

Display and edit iDoc

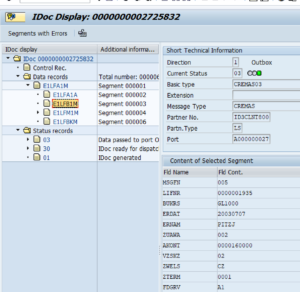
Let’s understand Vendor master iDoc. It has below segments. Segments are containers. Within each segments ae fields. For e.g.  E1LFB1M has fields LIFNR (Vendor Number), BUKRS (Company code) etc.

iDoc type : CREMAS

Segment Fields Fields Description Sample Value
E1LFB1M – Segment for company code data for vendors LIFNR Vendor account number 1935
  BUKRS Company code 1000
  ERDAT Date 20030707
  ERNAM Person who created Vendor number PITZJ
  ZUAWA Sort Key 002
  AKONT Reconciliation account 0000160000
  ZTERM Payment Term 0001

You can go to transaction SE11, enter iDoc segment and see all fields in the iDoc segment

SAP iDoc : Inbound

SAP inbound iDoc is generated outside of receiving SAP system. Middleware system like EDI / Mulesoft receive the inbound data which could be in the flat file, xml format. This is than transformed into iDoc format by the middleware system. This iDoc is than sent to receiving SAP system. SAP system process the iDoc and post documents in SAP

iDoc integration overview


Configuring inbound iDoc in SAP

SAP has different iDoc types for different purposes. Here we will configure Customer master outbound iDoc type (DEBMAS). Below are some of the iDoc types:

iDoc Purpose iDoc Type Message Type
Post Vendor Invoice ACC_INVOICE_RECEIPT03 ACC_INVOICE_RECEIPT
Post Customer Invoice ACC_BILLING02 ACC_BILLING
Acknowledgement iDoc   ALEAUD01   ALEAUD

Please refer to SAP Note #210137 for more details on above iDocs

Below steps are involved in setting up outbound iDoc in SAP

  1. Create Logical System in sap
  2. Create RFC Destination in sap
  3. Allocate Logical System to Client
  4. Maintain Ports

Above steps are common for both inbound and outbound sap iDocs. These have been covered in detail in SAP iDoc Tutorial 1

  • Create Partner Profile in sap


Create Partner Profile in sap  Transaction code : WE20

This has to be configured separately for different iDoc types. Here we will set it up for inbound iDoc type ACC_INVOICE_RECEIPT03 (Post Vendor Invoice)

Select folder LS (Logical System) – Now click the create button

In the Partner Number field enter the receiving system created earlier

In the inbound Parameters click the plus sign
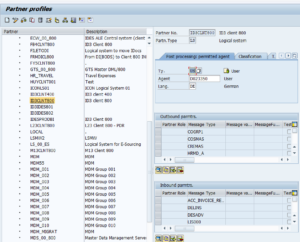
In the next screen enter iDoc message type ACC_INVOICE_RECEIPT and other details as shown below
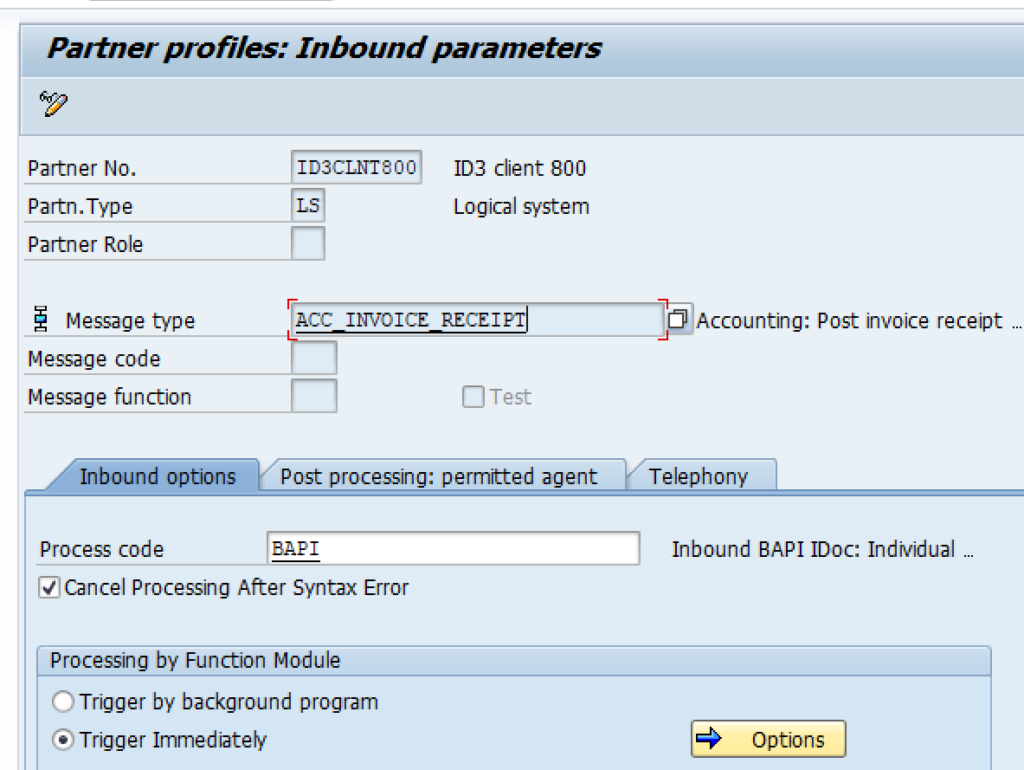
Inbound iDoc Partner profile


Test Inbound iDoc

We can use transaction code WE19 to test iDocs. Enter the details as shown below:

Transaction code : WE19

Used for testing iDoc

Enter the iDoc type or message type as shown below:

Now double click on segment EDIDC and enter sender and receiver data
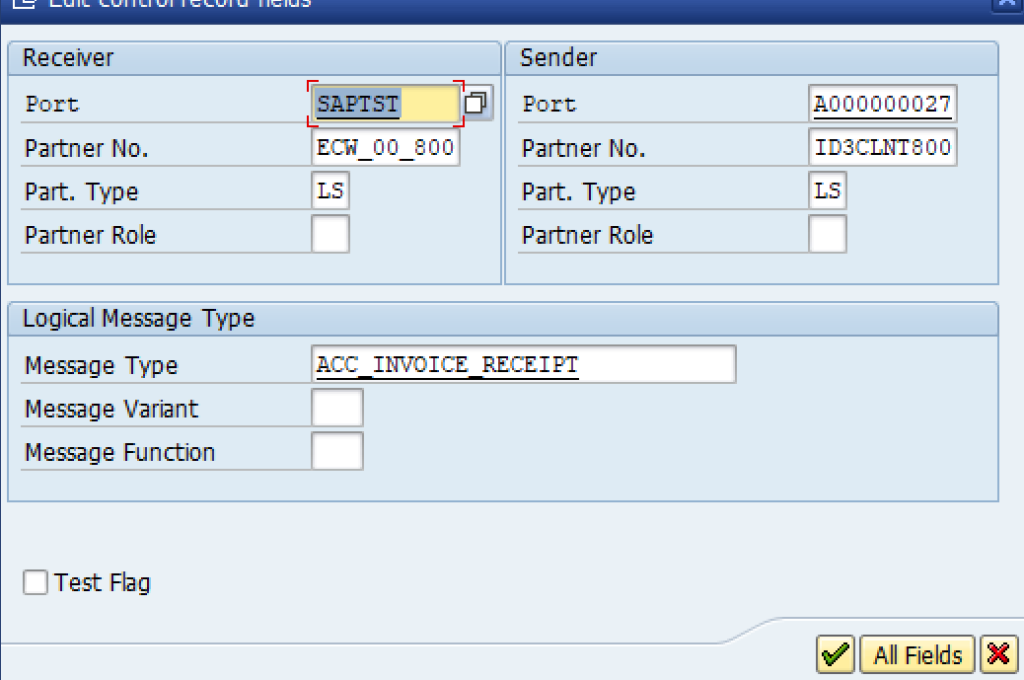
Test iDoc in WE19

Test iDoc in WE19

Enter data in Vendor Invoice header record segment #E1BPACHE03
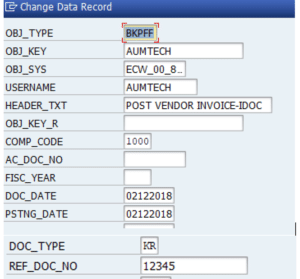
Test iDoc in WE19

Enter data in Vendor Invoice Vendor Line item record segment #E1BPACAP03

iDoc-9

Test iDoc in WE19

Enter data in Vendor Invoice GL Line item record segment # E1BPACGL03

Test iDoc in WE19

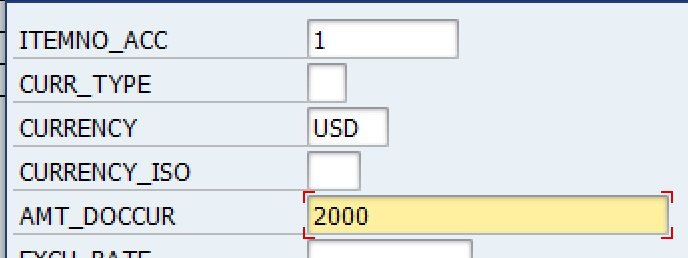
Enter amount for vendor line item, segment # E1BPACCR01
Test iDoc in WE19

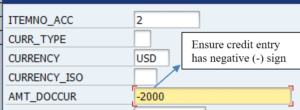
Enter amount for GL line item, segment # E1BPACCR01
Test iDoc in WE19

This content is for SAP FINANCE-Silver members only.
Register
Already a member? Log in here

SAP iDoc Read More »

error: Content is protected !!