SAP

SAP Internal Order

Table of Contents Internal Orders Concepts Introduction Internal Orders are used to manage small projects. You can set budget, post actual and do expenditure analysis for these small projects. Internal orders can be used to manage expenditure on Exhibitions, Trade shows, etc. There are two types of Internal Orders – Real / Statistical Real Real […]

SAP Internal Order Read More »

SAP Product Costing

SAP Product Costing Concepts
Find Cost which are part of Product Cost (COGM)
Find optimum Lot size for manufacturing the product
Find Product cost for each manufacturing location / Plant
In Product costing we estimate the product cost. Product cost estimate is also known as standard product cost
Various techniques used to calculate product cost estimate are as below:
BPO: Base Planning Object
Cost Estimate without quantity structure
Cost estimate with Quantity Structure: BOM and Routing
BOM: It is list of Raw material along with their quantity used to manufacture the product
Routing: List of activities like operation 1, operation 2 etc. performed on raw material to convert it into finished goods
Product Costing is divided into 3 different topics as below:
Planning: Calculate standard cost
Cost Object Planning: This will cover period end process, i.e. Planned cost, Actual cost, variance, settle production order
Actual Costing / Multiple valuations: Material Ledger
SAP Product Costing Types 

There are two Product Costing Types

MTS (Make to Stock): In this type goods are produced and stocked. They are sold from the stock. Under MTS there are two scenarios
Product Costing by order
Product costing by period
MTO (Make to Order): This is used for large equipment’s, aircraft manufacturing etc. In this type manufacturing of product starts after receiving the sales order.
SAP Product Costing Configuration

This involves settings for below activities

Costing variant for Plan cost
Costing variant for Actual Cost
Period end process:
WIP
Variance (Plan – Actual Cost)
Settlement: This involve settlement of production order
Create PA transfer structure for COPA
FI entries for WIP and variance are posted only at the time of production order settlement

Integration with PP (Production Planning)

For detailed, step-by-step instructions on SAP Product Costing, follow along with my video tutorial below.

SAP Product Costing Training

Costing Sheet Configuration in SAP

Costing Sheet explanation

What is Costing sheet:

The costing sheet integrates all elements of overhead costing. It consists of the following rows that are processed during the calculation:

Base Row: This contain the calculation Base. Calculation base is made up of cost elements on which OH is calculated
OH Rates Row: This contain OH Rates. OH rates contain percentage rate which applied on calculation base to arrive at OH amount
Total Rows: Used to form subtotal or total of earlier rows. No calculation performed on these rows

Set Controlling Area: OKKS

Controlling area: MK14

Define Costing Sheet Components- Calculation base

Path: SPRO – Controlling – Product Cost Controlling – Product Cost Planning – Basic settings for material costing – Overhead – Costing sheet components – Define Calculation base

The calculation base determines to which cost elements overhead is applied together.

Define Costing Sheet Components- % OH Rates

Path: SPRO – Controlling – Product Cost Controlling – Product Cost Planning – Basic settings for material costing – Overhead – Costing sheet components – Define Percentage OH rates

Define percentage overhead rates, for example, 10% in controlling area AUM1.

Select OH Rate 19MH and below entries

Select 19AH OH rate and make the below entries

Define Costing Sheet Components- Credits

Path: SPRO – Controlling – Product Cost Controlling – Product Cost Planning – Basic settings for material costing – Overhead – Costing sheet components – Define Credits

Here you define Cost center which is to be credited with OH cost. Further this credit is recorded under secondary cost element of category 41 (overhead rates)

Define Costing Sheet

Path: SPRO – Controlling – Product Cost Controlling – Product Cost Planning – Basic settings for material costing – Overhead – Costing sheet

Select Base, OH or Credit and click the respective row to see the details configured earlier

Define Costing Variant in SAP

Costing Variant contain Costing Type, Valuation Variant, Date Control, Quantity structure control, Transfer control and reference variant. We will create three costing variants -   Standard cost, Planning cost and Actual cost variant

Costing variants is the link between product costing and Customizing,

The costing variant contains all the control parameters for costing.

The costing variant for a material cost estimate contains the following control parameters:

Costing type
Valuation variant
Date control
Quantity structure control
(only relevant for cost estimates with quantity structure)
Transfer control (optional)
Reference variant (optional)

Note:

Costing Type: Determine type of cost is calculated., whether standard cost, Cost for reporting, etc.

Valuation variant determine how Material, Activities, Subcontract, External Operations and OH are valued

Date Control: Determine validity period of costing run

Define Costing Variant-Costing Type

Path: Controlling – Product Cost controlling – Product Cost planning – Material Cost estimate with quantity structure – Costing variant components – Define costing type

Here you define the purpose of a material cost estimate by specifying, field in the material master record to which the costing results can be transferred to:

Update – Material master Fields Cost Estimate (CK40N)
Standard price Standard cost estimate (01)
Tax-based price Inventory cost estimate
Commercial price Inventory cost estimate
Price other than std. price Modified standard cost estimate 

In a client there can be only one costing type for standard price. We will keep SAP standard costing type 01 for standard price

Define Valuation Variant in SAP

Path: Controlling – Product Cost controlling – Product Cost planning – Material Cost estimate with quantity structure – Costing variant components

Here you specify parameters to be used for cost estimate

Material Valuation: define the sequence in which the system searches for prices from the accounting view or costing view of the material master record to valuate materials. E.g. We can specify the sequence in which material price is picked - use moving average price, if not available use Standard Price, if not available use Purchase Info record and so on
Activity Price: Sequence in which activity price is picked. For e.g. take Plan activity price, if not available take actual activity price and so on
Overhead costs: Link the costing sheet prepared in earlier steps to pick the OH cost for cost estimates

Activity type price priority

Sub-contracting price sequence

External Operations price sequence

Under OH select the costing sheet created earlier

OH, on Material Components. Not required in our scenario. If costing sheet assigned here OH 10% and 15% defined in costing sheet will be added to the raw material

To display Number in the drop down enable visualization in the options as below

Valuation variant is defined at plant level

Define Date Control in SAP

Path: Controlling – Product Cost controlling – Product Cost planning – Material Cost estimate with quantity structure – Costing variant components

Tcode: OKK6

Date control determines which dates are proposed or displayed when a cost estimate is created, and whether these dates can be changed by the user.

The validity period of the cost estimate
The date on which the quantity structure is determined  ( quantity structure date)
The date on which the quantity structure is valuated ( valuation date)

Define Quantity Structure Control in SAP

Path: Controlling – Product Cost controlling – Product Cost planning – Material Cost estimate with quantity structure – Costing variant components

Tcode: OKK5

Check BOM Selection in SAP

Path: Controlling – Product Cost controlling – Product Cost planning – Material Cost estimate with quantity structure – Settings for qty structure - BOM Selection – Check BOM selection

Tcode: OPJI

BOM: BOM (Bill of Material) : This is list of Raw material along with the quantities required to produce Finished Goods

Specify different sequences of priorities of BOM usages according to your requirements

Check BOM Application

Path: Controlling – Product Cost controlling – Product Cost planning – Material Cost estimate with quantity structure – Settings for qty structure - BOM Selection – Check BOM application

Tcode: OPJM

Here you define BOM application area. Now you assign BOM selection ID created earlier to this BOM application area. Selection ID decides the sequence in which BOM are selected during cost estimate for this BOM application area

Check Routing Selection

Path: Controlling – Product Cost controlling – Product Cost planning – Material Cost estimate with quantity structure – Settings for qty structure - Routing Selection – Check automatic routing selection

Tcode: OPJF

Routing: It is sequence of activities. It specifies on which Work Center (A work center typically refers to a machine) what activities are to be performed for how many hours. Raw Material is converted into finished goods at work center

Define a Routing selection ID

Assign it to alternative selection priorities

Specify selection priority for each of these scenarios

ID: A6: Can be any identifier
SP: Selection Priority
Task List: N: Routing, R: Rate Routing
Plan Usage: 1: Production
Status: 4: Released general

Assign BOM application ID and routing selection ID in Quantity structure control

Tcode: OKK5

Define Transfer Control in SAP

Path: Controlling – Product Cost controlling – Product Cost planning – Material Cost estimate with quantity structure – costing variant component – define transfer control

Tcode: OKKM

Transfer Control: The transfer control specifies how the existing cost estimate is to be used in the cost estimate of the other product. For e.g. Costing done at beginning of the year. All components of the product cost have to be costed to arrive at final Standard Cost. Costing of new component during the year. We can use standard cost of components costed at the beginning of the year if they are being used in manufacture of this new Product. Here we will use the transfer control

In this step you define parameters for partial costing. The purpose of partial costing is to prevent the system from creating a new cost estimate for a material when costing data already exists. Instead, the existing costing data is simply transferred into the new cost estimate. This improves performance.

Define Costing Variant in SAP

Path: Controlling – Product Cost controlling – Product Cost planning – Material Cost estimate with quantity structure – Define costing variant

Tcode: OKKN

Select costing component created in earlier steps and assign to Costing variant MK14. Costing type assigned is 01 Standard Cost and not one created earlier as we want to do standard costing

Qty Structure selection

Additive cost. These are transportation, packing cost added to COGM.

Update selection

Itemization: Detailed break up of cost based on its components

Error management selection

Assignment are optional so ignored for now

Define Cost Component Structure in SAP

Path: Controlling – Product Cost controlling – Product Cost planning – Basic settings for material costing – Define Cost component structure

This content is for SAP FINANCE-Silver members only.
Log In Register

SAP Product Costing Read More »

SAP Asset Accounting

SAP Asset Accounting Overview

The Asset Accounting component is used for managing and supervising fixed assets with the SAP System. In Financial Accounting, it serves as a subsidiary ledger to the General Ledger, providing detailed information on transactions involving fixed assets. Asset Accounting will be covered in this tutorial in below steps

Description Topics covered
Organization Structure Check Country Specific Settings
  Copy Reference Chart of Depreciation
  Create 0% tax codes for Sales and Purchases
  Assign Input Tax indicator for Non-Taxable Asset Acquisitions
  Assign Chart of Depreciation to Company codes
Structuring Fixed Assets Create Asset Class
  Create Account Determination key
  Create Screen layout
  Define Number range interval
  Define Screen Layout for Asset Master
  Assign Screen layout Rule to the Asset Class
Depreciation Areas Real Depreciation area
  Derived Depreciation area
  Define Depreciation areas
  Specify Depreciation area types
  Specify Transfer of APC values
  Activate depreciation areas that will be used in asset class
  Define Screen layout for Depreciation areas
  Assign Screen layout to Depreciation Areas
Integration Create GL accounts
  Assign GL Accounts to Account Determination key
  Specify Posting key for asset posting
  Specify Document type to post depreciation
  Activate Account Assignment
  Specify Controlling Object (WBS, CC, IO) for APC and Dep
  Specify Memo Value
  Specify Memo Value not considered for an ASSET Class
Depreciation Depreciation Overview
  Define Multilevel Depreciation method
  Define  Period Control Depreciation Method
  Maintain Depreciation Key
End Users Transactions Main Asset creation
  Sub asset creation
  Post Purchase to main assets
  Post Purchase to Sub assets
  Asset Explorer
  Reports to view assets
  Monthly Depreciation run
Asset Under Construction Define Settlement Profile
  Assign Settlement profile to company code
  Create Number range for settlement document
  Create AuC Asset Master
  Post purchases to AuC
  Line Item settlement from AuC to Main Asset
Asset Retirement with Revenue Create Asset Master Record
  Post External Acquisition to AMR
  Verify in Asset Explorer
  Run Planned Depreciation
  Retire Asset with Revenue-Customer
Asset Scrap Create Asset Master Record
  Post External Acquisition to AMR
  Verify in Asset Explorer
  Run Planned Depreciation
  Asset Scrap
Intra Company Asset Transfer Create Asset Master Record
  Post External Acquisition to AMR
  Verify in Asset Explorer
  Run Planned Depreciation
  Intra company transfer asset- Change Asset Class
Asset Accounting Yr .End Closing Execute Depreciation run
  Execute Periodic Asset posting
  Execute Fiscal Year Change
  Asset Accounting Year End close


Organization Structure

Check Country Specific Settings

Transaction code: OA08

Asset accounting country specific settings

  • Max LVA: If you set a maximum amount for low value assets, this prevents postings of amount greater than specified here to Asset class LVA
  • Post Net Book Value: Set this indicator, if you do not want the system to create a gain/loss posting for an asset retirement by sale, or if you do not want a loss posting when the asset is scrapped. Instead, the system then generates a posting in the amount of the net book value of the given asset. This indicator applies only to depreciation area 01.


Copy Reference Chart of Depreciation

Chart of Depreciation

  • The chart of depreciation, therefore, is a directory of depreciation areas organized according to business management requirements. Asset Accounting component enables you to manage values for assets in parallel in up to 99 depreciation areas
  • Specify description of Chart of Deprecation
  • Delete unwanted Depreciation Areas
  • One or more company codes can be assigned to a Chart of Depreciation

Tcode: EC08

Path: SPRO – Financial Accounting – Asset Accounting – Organizational Structures– Copy Reference Chart of Depreciation

Reference COD Copied COD Company Codes
0US MK14 MK14

copy reference chart of depreciation


Create 0% tax codes for Sales and Purchases

Transaction Code: FTXP

Create 0% input tax code: V0

Maintain tax codes

Create 0% Output Tax Code: AO

Maintain tax codes


Assign Input Tax indicator for Non-Taxable Asset Acquisitions

Tcode: OBCL

Assign tax indicator for Non taxable asset acquisition


Assign Chart of Depreciation to Company codes

Tcode: OAOB

Path: SPRO – Financial Accounting – Asset Accounting – Organizational Structures – Assign Chart of Depreciation to Company code

Assign chart of depreciation to a company code


Structuring Fixed Asset

Asset can be structured at below levels:

  • Balance Sheet Level: Assets here can be grouped as per B/S version, Balance sheet items, GL accounts
  • Classification Level: Assets are structured using asset classes
  • Asset-Related Level: Asset can be structured based on Group asset, Main Asset and sub asset


Asset Classes

  • Asset class is a classification criterion for Assets. E.g. Plant, Building, machinery, Software Internally developed
  • The asset class provides default values to all asset master records in the class.
  • The screen layout, tab layout and the field characteristics (required/optional/suppressed) of the asset master record can be set for the asset class.
  • The assignment of asset numbers can also be controlled by the asset class.
  • To create Asset Class following must be first configured:
    • Account Determination Keys
    • Screen Layout Rule
    • Number Range Interval

Transaction code to create asset class: OAOA

Create Below Asset classes in SAP

Asset Class Description Acct Determination Screen Layout No. Range Inventory
LANDMK14 Land 61000 1000 01 X
BU_MK14 Building 62000 1100 02 X
PM_MK14 Plant and Machinery 63000 2000 03 X
FF_MK14 Furniture and Fixtures 64000 3000 04 X
VEH_MK14 Vehicles 65000 3100 05 X
AUC_MK14 AuC 66000 4000 06 Line Item settlement

Create asset class

AuC: Asset under Construction. Shown as separate Item in BS. When completed transferred to regular assets through line Item settlement (AIAB). Select Depreciation key which does not provide Depreciation for AuC. Select Negative APC in Depreciation areas to allow credit memo posting during capitalization

Create asset under construction asset class


Account Determination Key

Asset class establish the connection between the asset master records and the GL account in Financial Accounting through account determination key

Tcode to create account determination key: S_ALR_870009195

Path: SPRO-Financial Accounting- Asset Accounting- Organizational Structures- Asset Classes – Specify account Determination

Asset account determination key


Create Screen Layout Rule

Tcode: S_ALR_870009209

Create screen layout rule- asset accounting

Whenever you create an asset the system checks first the table ANKP.  If you have chart-of-depreciation-dependent account determination, then an entry in the table ANKP is made. If you than make a copy from such an asset class in the asset class there is another account determination than in the table ANKP and the system takes the account determination from the table ANKP and not from the asset class.                                                                            

Normally you can’t define chart-of-depreciation-dependent assignments (with transaction ANK1) if there is only one chart of depreciation. If you’d like to change (or delete) this assignment you can use following workaround:                                                   

    SM34 -> View ANKA_ALL -> Maintain                                      

       – select asset class ART (for example)                              

       – Then click in the left column on “Chart of dep – dep data”     


Define Number Range Interval

Tcode: AS08

Enter company code MK14. Now click Change interval button and enter the below details:

Define asset accounting number range


Define Screen Layout for Asset Master (AS01 Screen)

Tcode: S_ALR_87009044

Path: SPRO – Financial Accounting- Asset Accounting – Master Data – Screen Layout – Define Screen Layout for Asset Master Data

Select Screen layout 1000-Land and Select folder ‘Logical field group’

Define screen layout for asset master record

Select field group Posting information. Make ‘Capitalization date’ as required field

Select field group posting


Assign Screen layout Rule to the Asset Class

Transaction code: OAOA

assign screen layout rule to asset class


Depreciation Areas

  • Depreciation areas are used to manage a fixed asset value for multiple purpose. For e.g. asset value as per Income Tax act, Companies act and for management purpose could be different. One of the reasons for this difference could be different depreciation rate under Income tax act and Companies act. Depreciation areas allow us to maintain parallel value of asset for different purposes.
  • You need at least 1 depreciation area -01
  • Maximum number of Depreciation areas allowed are 99
  • Chart of Depreciation is made up of a list of Depreciation areas

Real Depreciation Area

  • Denoted by 01
  • Also called Book Depreciation
  • Automatic Posting to FI Deprecation Accumulations, Asset Acquisition and Depreciation Account in company code currency
  • Legacy data is always transferred to this Depreciation Area

Derived Depreciation Area

  • This Depreciation area takes values from Real depreciation area. To these values it applies mathematical formula to arrive at Asset value as per derived depreciation area
  • Derived depreciation area is denoted by a key (say 32) which should have higher value than the depreciation area ( say 10) from which it derives value


Define Depreciation Areas in Chart of Depreciation

Tcode: OADB

Define depreciation areas in chart of depreciation

 To create new depreciation area, copy and rename an existing Depreciation Area


Specify Depreciation area Type

Transaction code: OADC

Specify depreciation area type

Specify Transfer of APC (Acquisition and Production cost) Values

Tcode: OABC

Specify how values are transferred from Real Depreciation Area to Derived Depreciation Area

Depreciation Area. Values transferred from Real Dep area 01 to Derived Depreciation areas

If selected system, ensure that all APC-relevant posting values to this depreciation area are transferred from the transferring depreciation area with no opportunity for changing the values

Specify transfer of APC values


Activate Depreciation Areas which will be used in an Asset Class

Tcode: OAYZ

SPRO – Financial Accounting – Asset Accounting – Valuation – Determine Depreciation areas in the Asset Class

SAP Asset Accounting Read More »

SAP Foreign Currency Valuation

Foreign Currency Valuation in SAP

FASB 52: is issued by US accounting standard board. It provides guidance on financial reporting of companies operating in foreign countries

  • Functional Currency: Currency of the economic environment in which the entity operates. In case of SAP functional currency is generally company code / local currency of the entity (In this case company Code). All assets, liabilities and operations of foreign entity should be measured in functional currency
  • Group Currency: This is the currency of the parent company.
  • Foreign Currency transactions: These are transactions in a currency other than the functional currency of the company code
  • Unrealized foreign currency gain/ loss: Receivables/ Payables in foreign currency have to be reported in-group currency at exchange rate on month end. Difference between group currency and company code currency exchange rate on transaction date and month end is posted as profit/ gain from foreign currency revaluation. This is than reversed at the beginning of the next month
  • Realized Gain / Loss: These are gain or loss due to exchange rate difference when actual payment made to vendor or cash received from customers.

Now let’s configure and test foreign currency valuation in SAP

Main topics covered in this tutorial are as below

s.no Topics
1 Configure Parallel currencies
2 Enter exchange rates
3 Define New Exchange Rate Type
4 Specify Exchange Rate type to be used
5 Specify whether Direct or Indirect quote has to be used
6 Define Translation ratios
7 Valuation Method Setup
8 Define Valuation Area
9 Assign valuation area to accounting principles
10 Automatic account determination for open item exchange rate differences
11 Additional Settings to display valuation differences in FBL1N/ FBL5N
12 Month End Foreign currency revaluation and end user postings
13 Post a foreign transaction vendor Invoice
14 Update Exchange Rate in transaction code OB08
15 Run and analyze Month end foreign currency valuation


Configure Parallel currencies

Transaction code: OB22

Parallel Currencies in SAP

1st Local Currency

Srce curr. : Translation is taking transaction currency as base. We can also select translation using first local currency as base

Exchange Rate Type: M. this exchange rate type will be used for currency translation at the time of monthly valuation and also when posting FI documents in a currency other than company code currency


Enter Exchange Rate for Exchange Rate type ‘M’

Tcode: OB08

System will use the latest exchange rate

Define Exchange Rate : OB08


Define New Exchange Rate Type

Path: SAP Net weaver – General Settings – Currencies – Check Exchange Rate Type

Define new exchange rate type

Indicator that in the case of a missing exchange rate entry in the system for the required translation from one currency into another, the inverted exchange rate relationship may also be used


Specify Exchange Rate Type to be used by Vendor Invoice

Tcode: OBA7

We can specify the exchange rate type to be used by a specific document type ( KR) in transaction code OBA7

Specify exchange rate type

Let us change it to ‘M’


Specify whether Direct Quote or Indirect quote is to be used

Path: SAP NetWeaver – General Settings – Currencies – Define Standard quotation for exchange rate

Specify whether direct quote or Indirect quote to be used


Define Translation ratios between currencies

Path: SAP NetWeaver – General Settings – Currencies

Always use SAP default

Define exchange rate translation ratios


Valuation Method Setup

Path: SPRO- Financial Accounting (New) – General Ledger Accounting (New) – Periodic Processing – Valuate – Define Valuation Methods

Tcode: OB59

Here define Valuation method for Open Items

Define foreign currency valuation method setup

Valuation Procedure:

  • Lowest Value Principle: If selected valuation is done only if the exchange rate difference results in exchange rate loss. Valuation posted only if giving negative result
  • Always evaluate: Exchange rate difference always posted whether gain or loss
  • Revalue Only: The opposite of the first one, valuation is only posted when positive


Define Valuation Area

Path: SPRO- Financial Accounting (New) – General Ledger Accounting (New) – Periodic Processing – Valuate- Define Valuation Areas

Define valuation area for closing operations

Assign Valuation method defined in last step to the valuation area

Define Valuation area


Assign Valuation Area (RM/RU) to accounting principles

Path: SPRO- Financial Accounting (New) – General Ledger Accounting (New) – Periodic Processing- Assign valuation area to accounting principles

Assign valuation area to accounting principles


Account Determination for Open Item Exchange rate differences

Path: SPRO- Financial Accounting (New) – General Ledger Accounting (New) – Periodic Processing – Valuate- Foreign Currency Valuation – Automatic Posting for foreign currency valuation

Tcode: OBA1

Select transaction ‘KDF’

Automatic account determination for open item exchange rate differences

Here we have Customer / Vendor reconciliation accounts. For these automatic postings at time of foreign currency, revaluation must be specified

Vendor Master: XK03

SAP Foreign Currency Valuation Read More »

SAP Cash Management

Cash Position Report

The cash position gives information on the current financial situation in your bank accounts and bank clearing accounts.

The cash position displays the activity in your bank accounts. It is derived from the value date of all payments made within a short period of time. Data is supplied from three sources:

  • FI postings to the G/L accounts relevant to Cash Management
  • Memo records entered manually
  • Cash flows from transactions managed in the Treasury Management component

Cash Position Configuration

Define Source Symbols

Path: SPRO – FSCM – Cash & Liquidity management – Cash Management – Basic Settings – Define Source Symbols

In this step, you define source symbols and allocate them either to the liquidity forecast or to the cash position.

Cash Position report- Source Symbols

Cash Position: If selected the source symbol is allocated to the cash management position, otherwise it is allocated to the liquidity forecast.

Define Planning Level

SPRO- FSCM – Cash and Liquidity – Cash Management – Master data – GL Accounts – Define Planning Level

In this step, you define a planning level for each cash account and allocate this planning level to the cash position by using the appropriate source symbol define earlier. Financial transactions in Cash report (FF7A) are displayed using planning levels in order to explain beginning and ending account balances.

In the standard R/3 System, levels starting with “F” or “B” are reserved for automatically updating data during posting. 

  • ‘F’: is allocated to Bank accounts, Customers and Vendors
  • ‘B’: is allocated to Bank clearing accounts
  • CP/UP: These are manually entered payment advices

These are entered in GL accounts master data in FS00. Based on these levels we can know whether amount is Bank, Clearing or Payment advice in the cash flow report

SAP Recommendation

  • Level F0 for bank accounts
  • Level F1 for customers and vendors
  • Levels B1 to Bn for bank clearing accounts
  • Level CP, for example, for confirmed payment advice notes
  • Level UP, for example, for unconfirmed payment advice notes
  • Level NI, for example, for noted items

Source Symbol BNK, implies it will affect the Cash Flow Report

These Planning levels are assigned to Cash Position relevant GL accounts in FS00

Relevant to Cash Flow: If selected, can enter House Bank and Account ID in GL account


Define Planning Groups- AR/AP

Path: SPRO – FSCM – Cash and Liquidity Management – Cash management – Master Data – Sub ledger Accounts – Define Planning Groups

In the customer / vendor master record (Transaction code: XD02/XK02), we can allocate customer / vendor to a planning group. A planning group represents a set of customers / vendors with specific risk profile

We will use the SAP standard planning groups as below:

Vendors

Planning Level

Customers

Planning Level

Assign Planning Groups in Customer / Vendor Master Data as below:

Vendor Master : XK02

Vendor Master update

Customer Master: XD02

Customer Master update


Structuring

Define Cash Management Account Name

FSCM- Cash and Liquidity Management – Cash management – Structuring – Define cash Management Account name

Here you can replace G/L account number with a mnemonic account for each bank account and bank clearing account.  This mnemonic name is used with all functions and reports in Cash position report (Transaction code: FF7A) instead of the account number.

Cash management Account Name

CMF: If you select this field, the account specified is regarded as an internal, cash management and forecast account without a G/L master record.


Maintain Grouping

FSCM- Cash and Liquidity Management – Cash management – Structuring – Grouping – Define Grouping and maintain Header.

In this step, you define the groupings, and stipulate the Main headings and the line headings that the system displays in the cash position (FF7A) or liquidity forecast report.

Groupings affect:

  • Cash Position and Liquidity forecast
  • Cash Concentration

Image-9

Cash position report groupings


Maintain Structure

FSCM- Cash and Liquidity Management – Cash management – Structuring – Grouping – Maintain Structure

In each grouping you must configure one line of type ‘E’ and one line of type ‘G’

Specify:

  • The accounts you want to see in the grouping and those you want to exclude
  • The summarization term under which you want to group together the lines for levels (E) and the lines for groups (G) in the display
  • The line type, whereby “E” stands for level and “G” for the account or planning group.

Field Selection: Here you have to enter the

  • Levels or 
  • Accounts or
  • Planning groups

Which are to be included in the display or excluded from it. The entries can be masked from the right with ‘+’ to allow a generic entry.

It is important for the entry to match the level, account, in length. This means the entry for levels (F0, F1 etc.) must have two characters; that for accounts must usually have 10.

The following are examples of entries for levels:

•’F1′

•’F+’

•’+1′

•’++’

The following are examples of entries for bank accounts:

•’0000113100′   you must enter the leading zeros.

•’000011310+’

•’00001131++’

The company code and chart of account entries are optional. You can use them to restrict the data considered to one or more company codes.

Cash Position report

Selection: Enter Bank Main accounts and Bank Clearing accounts

Grouping Structure Cash Position report


Maintain Structure for Liquidity Forecast

SAP Cash Management Read More »

SAP Electronic Bank Statement Tutorial

SAP EBS

In this tutorial we will be discussing Electronic Bank statement in SAP. Below topics will be covered

  • Electronic Bank Statement business process in SAP
  • EBS Configuration in SAP
  • Electronic Bank Statement file layout – BAI2, MT940
  • Generate a test EBS BAI2 file in SAP using testing program
  • Test out EBS configuration using the test file in SAP
  • Post processing of EBS file

Electronic Bank Statement in SAP :EBS Business Process

EBS business process


EBS Business Process

In SAP bank statement has to be entered in SAP for reconciling with the company data. The bank statement can be manually entered in SAP or an electronic bank statement can be imported into and processed automatically in SAP.

In order to import the electronic bank statement in SAP, the bank statement should be available in specified bank formats such as BAI2, MT940 format

After importing the bank data, the system interprets the bank data based on the transaction types contained in the bank statement. Based on the rules defined for each bank transaction type the bank items are matched with the company data in SAP. On matching the bank transaction with the transaction in company books the item is marked as cleared in SAP and necessary accounting entry is passed to transfer the same from bank clearing account (Bank sub-account) to the bank main account. The items in bank statement which are not matched are available for processing manually. These items have to be processed manually and cleared with the relevant company data (Transaction code FEBAN)

After the process is completed, the bank main account in SAP will match with the bank statement and the other reconciliation items such as checks issued but not presented, bank charges debited by bank but not accounted in books etc. is available in bank clearing sub accounts for review.

In SAP for every Bank account of the company two set of GL accounts are maintained – Bank main account and Bank clearing sub-account.

The Bank clearing Sub-accounts ensure that all incoming and outgoing payments are only posted to the bank Main account when the transaction is debited /credited in the Bank statement. The entries from the bank sub-accounts to bank main account takes place in SAP when the bank statement (EBS) received from the bank is uploaded in SAP.

SAP EBS Accounting Entries

Accounting Entries – Payment to vendor (Outgoing)-F110

Vendor Account                          Dr

Bank Clearing Account               Cr

Accounting Entries – Post Electronic Bank Statement in sap

Bank Clearing Account   Dr

Bank Main Account         Cr

Accounting Entries – Customer Payment Received (Incoming)

Bank Clearing Account   Dr

Customer Account          Cr

Accounting Entries – Post Electronic Bank Statement

Bank Main Account         Dr

Bank Clearing Account   Cr

Accounting Entries (Bank Charges) – Post Electronic Bank Statement

Bank Charges Account    Dr

Bank Main Account         Cr

Topics discussed in detail in this tutorial

SAP EBS : Tutorial 1

SAP EBS Configuration steps

Bank Master Creation


Create House Bank

Update Customer/ Vendor master with bank details

Electronic Bank Statement Implementation

Create Account Symbols

Assign Account Symbols to GL accounts

Create Keys for Posting Rule

EBS Posting Rule

Create Transaction Type

Assign External Transaction Types to Posting Rules

Assign Bank Account to Transaction Type

SAP EBS Configuration


For detailed, step-by-step instructions on SAP EBS course follow along with my video tutorial below

EBS

Bank Master Creation

Transaction Code: FI01 / FI02 / FI03

Bank master creation

House bank

Transaction code:  FI12

House Bank

  • Bank Country:  Identifies the country in which the bank is located
  • House bank:  Each bank is uniquely identified by a House bank. A house bank has one or more bank accounts (Current Account, Savings Acct, collection acct etc.). Combination of HB and Account ID uniquely identifies a bank account
  • Account ID: Identifies the bank account in the HB
  • Bank Account Number: Each Account ID has a unique Bank Account Number
  • Control Key: In the USA, this field determines whether you are dealing with a savings or checking account (if you do not enter a value, then 01 is taken as the default):
    • 01 Checking Account
    • 02 Savings Accounts
    • 03 Loans
  • GL Account: G/L account to which the transaction figures are updated.
  • Bank Key: Uniquely identifies the bank. Provided by the bank

Bank fields update in GL account

SAP VIDEO TUTORIAL

Update Vendor master with its bank details

Define Vendor bank to which payment will be made in SAP Payment run (Transaction code #F110)

Where vendor has many banks, identify them with value in field BnkT and enter this in Vendor Invoice line item to identify the bank to which payment will be made

Update Vendor master with its bank details

SAP  EBS : Configuration Steps

  1. Create Account Symbols
  2. Assign Account Symbols
  3. Create Keys for Posting Rules
  4. Define Posting Rules
  5. Configure Transaction Types
  6. Assign BAI Codes to Posting Rules
  7. Assign Bank Accounts to Transaction Types

Create Account Symbols

Specify G/L accounts (such as bank, cash receipt, outgoing checks) to which postings are to be made from the account statement. You assign account symbols to the G/L account numbers

IMG Path: Financial Accounting- Bank Accounting – Business Transactions – Payment Transactions – Electronic Bank Statement – Global Settings – Create Account Symbols

EBS- Account Symbols

Account Symbol Account Symbol Description
Y0 Master Account – 113020
Y1 Wires Out-113023
Y2 Wire In – 113027
Y3 ACH Out – 113028
Y4 ACH In – 113027
Y5 Check Out – 113025
Y6 Check In – 113022
Y7 ZBA Transfer – 113026
Y12 Bank Charges

Assign Account Symbols to GL accounts

IMG Path: Financial Accounting- Bank Accounting – Business Transactions – Payment Transactions – Electronic Bank Statement – Global Settings- Assign accounts to Account Symbols

Assign account symbols defined in step 1 to GL Accounts

Account Modification: With the help of this field, you can direct the posting to a differentiate bank subaccount instead of a standard one. Leave this field blank (or enter the mask “+”) if you do not want to use an account modification.

Acct Symbols Acct Mod. Cur. GL Account Notes
Y0 + USD ++++++++++ Main Bank
Y1 + USD 113023 Wire Out
Y2 + USD 113027 Wire In
Y3 + USD 113028 ACH Out
Y4 + USD 113027 ACH In
Y5 + USD 113025 Check Out
Y6 + USD 113022 Check In
Y7 + USD 113026 ZBA Transfer
Y12 + USD 660035 Bank Charges

Create Keys for EBS Posting Rule

Posting Rules carry out General Ledger and Sub-Ledger postings

IMG Path: Financial Accounting- Bank Accounting – Business Transactions – Payment Transactions – Electronic Bank Statement – Global Settings- Create keys for posting rule

Keys for Posting Rule  Text
Y02 Debit Master, Credit Wire In
Y04 Debit Master, Credit ACH In
Y06 Debit Master, Credit Checks In
Y08 Debit Master, Credit Other Transfer
Y10 Debit Wire Out, Credit Master
Y30 Debit ACH Out, Credit Master
Y50 Debit Checks Out, Credit Master
Y80 Debit Other Transfer, Credit Master

EBS - Posting keys

Define EBS Posting Rule

Here you specify how a given business transaction is to be posted.

IMG Path: Financial Accounting- Bank Accounting – Business Transactions – Payment Transactions – Electronic Bank Statement – Global Settings- Define Posting rules

Posting Area 1 is for Main Bank Accounting

Posting Area 2 is for Sub ledger Accounting

A posting type “option” is assigned to each rule

Posting Type Value
Post To G/L Only 1
Post to Sub-Ledger -DR 2
Post to Sub-Ledger -CR 3
Clear GL Account – DR 4
Clear GL Account – CR 5
Clear Sub ledger Account – DR 7
Clear Sub Ledger Account – CR 8

Posting Rule Posting Area PK ACCT (DR) PK ACCT (CR) DOC TYPE Posting Type
Y02 1 40 Y0 50 Y2 SA 1
Y02 2 40 Y2 DZ 8
Y04 1 40 Y0 50 Y4 SA 1
Y04 2 40 Y4 DZ 8
Y06 1 40 Y0 Y6 SA 5
Y08 1 40 Y0 Y8 SA 5
Y10 1 Y1 50 Y0 SA 4
Y30 1 Y3 50 Y0 SA 4
Y50 1 Y5 50 Y0 SA 4
Y80 1 Y8 50 Y0 SA 4

EBS- Posting Rule

Create Transaction Type

IMG Path: Financial Accounting- Bank Accounting – Business Transactions – Payment Transactions – Electronic Bank Statement – Global Settings – Create Transaction Type

Transaction types are assigned to bank account. This will determine what posting rules are used for a specific BAI code in that bank account

Transaction Type Name
BAI Bank Administrative Institute

Assign External Transaction Types to Posting Rules in SAP EBS

IMG Path: Financial Accounting- Bank Accounting – Business Transactions – Payment Transactions – Electronic Bank Statement – Global Settings -Assign External Transaction type to Posting rule

Assign External Transaction types to Posting Rules so that R/3 knows what to do with incoming EBS transactions 

Choose + or – depending on whether the transaction increases (+) (deposit) or decreases (-) (withdrawal) the bank account balance

EBS- Assign External transaction type to posting rules

Assign Bank Account to Transaction Type

Assign the bank accounts to a transaction type, for which the account statements are to be imported

IMG Path: Financial Accounting- Bank Accounting – Business Transactions – Payment Transactions – Electronic Bank Statement – Global Settings-Assign Bank accounts to Transaction types

EBS- Assign Bank account to transaction type


SAP EBS Online Video Course

SAP EBS : Tutorial 2

  • BAI2 File format explanation
  • File Header record
  • Group header record
  • Account Header and summary
  • Detail Transaction records
  • Continuation records
  • Account Trailer
  • Generate BAI2 file for testing in SAP
  • Upload Electronic Bank statement in SAP
  • Display Bank Statement
  • Key SAP transactions used in EBS


Bank File Format in SAP – BAI2 File

BAI2 Test file


EBS File Header record (Type 01)

BAI Field Description
Record ID Always 01
Sender ID Wells Fargo Routing number (121000248)
Receiver ID Alphanumeric customer ID assigned by Bank
File Creation Date File Creation date (YYMMDD)
File Creation Time File creation time (HHMM)
File ID Two-digit counter 01
Physical record length Always 080
Block Size Null (blank)
Version Number Always 2

BAI2 test file

Group Header record (Type 02)

BAI Field Description
Record ID Always 02
Ultimate Receiver ID Alphanumeric customer ID assigned by Wells Fargo / Bank
Originator ID Routing Transit number or Bank identifier code
Group status Always 1
As of Date YYMMDD
As of time Null
Currency Code Null
As of Date modifier Null

EBS BAI2 test file explanation

SAP Electronic Bank Statement Tutorial Read More »

SAP Controlling

Table of Contents SAP Controlling  Controlling module provide information to management for planning, reporting and monitoring of business operations. Controlling and Finance are independent modules in SAP. Data flows between Finance and Controlling module on real time basis. Cost Element provides the integration point between Controlling and Finance. A cost element can be an expense

SAP Controlling Read More »

SAP Accounts Receivable

Account Receivable

Accounts Receivable is a submodule of SAP FI and is used to manage and record Accounting data for all the customers. It handles customer invoices, customer receipts, correspondence and related activities. SAP Accounts Receivable will be covered in below  post

  • SAP AR Master Data
  • SAP Customer Correspondence
  • SAP Customer Dunning
  • Automatic calculation and posting of Interest on customer past due invoices
  • Lockbox

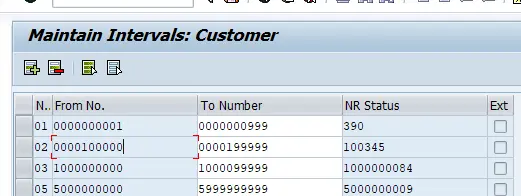
Create Number ranges for Customer Accounts

  • Number range can be internal / external
  • Number range decide customer master number at the time of creation. If external number range, you have to provide customer number at the time of customer creation. If internal number range, system generate the customer number at the time of customer creation
  • Number range are assigned to Customer Account Group

Transaction code: XDN1 Customer master number range  

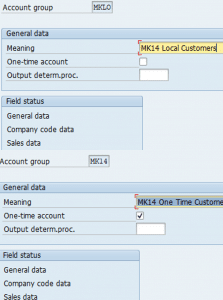
Define Account Groups

Customer are classified into various account groups. The account group determines the following:

  • Number range interval of the customer
  • Mandatory and Optional fields during customer master creation in transactions code XK01
  • Whether a customer is one time vendor

Transaction code: OBD2 Customer master account group


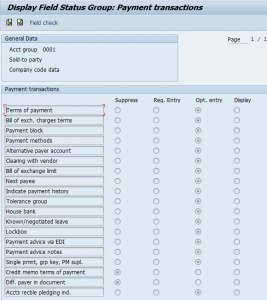
Field Status

This control the fields available in Customer master data accessed through transaction code XD01, XD02

Field Status


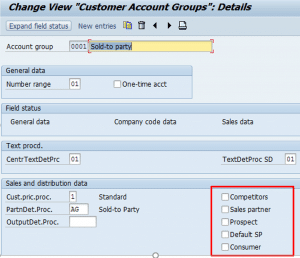
Assign number range and Customer Account group and define customer account group characters

Transaction Code: OVT0

Assign Number Range to Account Groups


Assign Number Range to Account Groups

Transaction code: OBAR

Assign Number Range to Account Groups


Define sensitive field for Dual Control

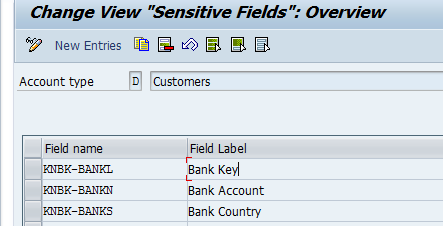
Transaction code: S_ALR_87003378 IMG Path : SPRO – Financial Accounting – Accounts Receivable and Accounts Payable – Customer Accounts – Master Data – Preparation for creating customer master data – Define sensitive field for dual control (Customers) We can define certain fields in customer master as sensitive fields. Any changes to these have to be confirmed by two users for the change to be effective. Further once a sensitive customer is changed, customer is blocked for sales till changes confirmed This block is removed when the change to sensitive field is confirmed by second user in transaction code FD08. If the change is rejected by second user in transaction code FD08, customer remains blocked for sales. Generally fields like Customer Bank account number, routing number are defined as sensitive fields

Define sensitive field for Dual Control


Create Customer master Record

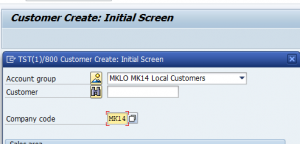
Centrally: XD01 Accounting Alone: FD01 Sales area only: VD01 Create customer in account group MKLO created earlier

Customer master Record

Customer master Record


Transaction codes for Customer Master

S.No. Description Transaction
1 Change Customer Master XD02
2 Display changes to Customer Master record XD04
3 Block / Unblock Customer Master XD05
4 Flag Customer master for deletion XD06

Delete Customer master records

Transaction code: OBR2 Master record can be deleted only if below conditions satisfied:

  • No transactions posted to the customer
  • Company code is not productive


Define Additional Fields for display in customer line item report

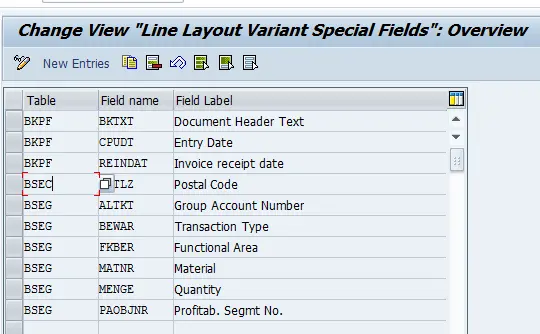
IMG Path : SPRO – Financial Accounting – Accounts Receivable – Customer Accounts – Line Items – Display line Items – Define Additional fields for Line Item Display Here we can define additional fields from table BKBF, BSEG, BSEC etc. which can be displayed in FBL5N Additional Fields for display in customer line item report

Incoming Payment

Task Description Transaction Code
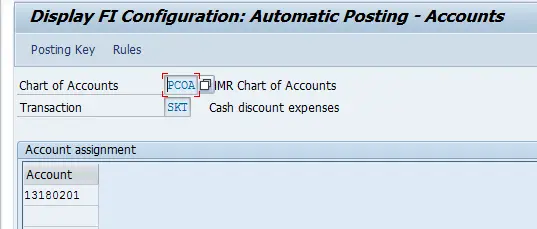
Accounts for Cash Discount System post to this account when clearing a customer invoice against payment received from customer with tolerances defined OBXI
Define accts for Under/ Over payments Discussed earlier OBXL
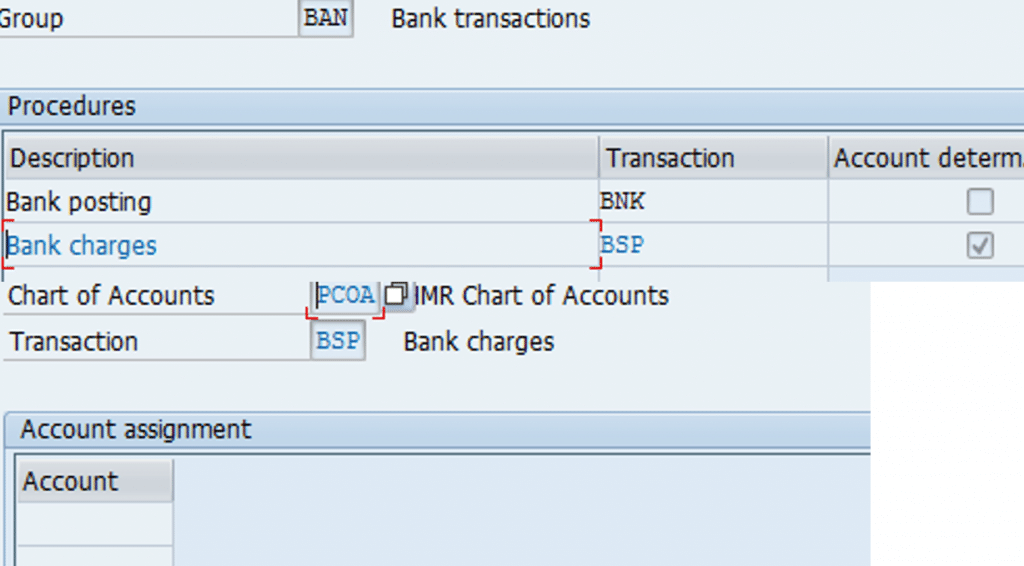
Bank Charges BNK : Bank Posting BSP : Bank Charges  OBXK

OBXI OBXI OBXK OBXK
 

Correspondence in SAP

Purpose When the customer misses the payment for the outstanding invoice within specified payment due date. The dunning letter is generated via sap program and send at customer address / email as reminder of outstanding payment. There are various standard correspondence types available like invoice print, account statement etc. Custom correspondence types can also be created. Correspondences can be created at the time of particular business transaction processing or at a later stage for already created transaction postings. Correspondence can be sent to customer/ vendor in various formats like email, and fax Various correspondence type which exist in SAP and can be copied to create new correspondence types are listed below:

Correspondence Type Correspondence Description Print Program Required Data Sample standard SAP Script Form
SAP01 Payment notices RFKORD00 Document number F140_PAY_CONF_01
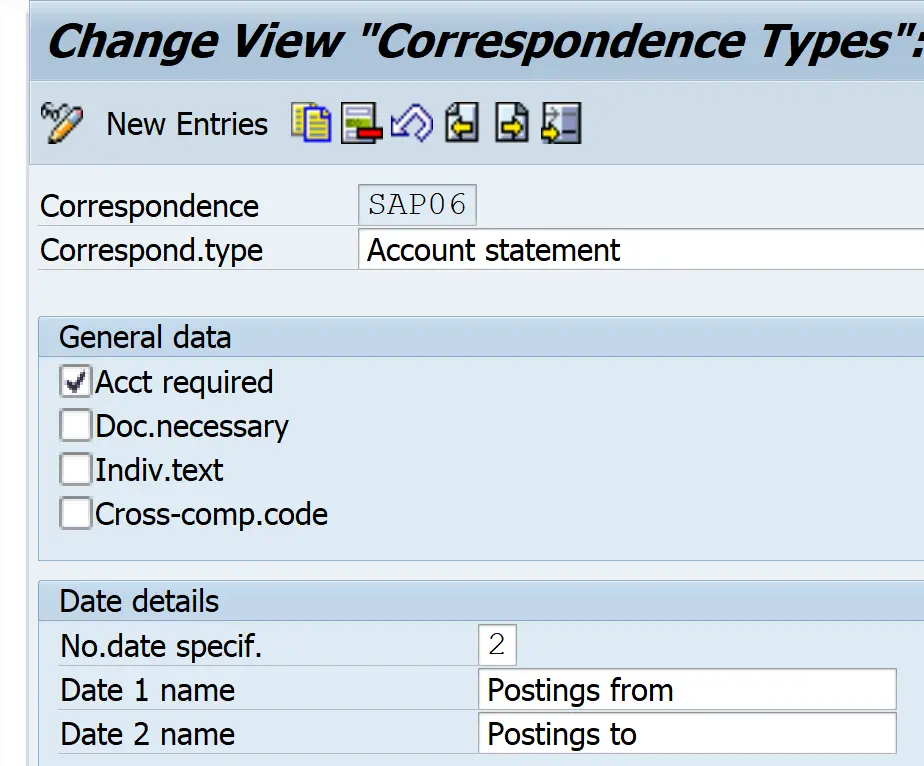
SAP06 Account statements RFKORD10 Account number and date F140_ACC_STAT_01
SAP07 Bill of exchange charges statements RFKORD20 Document number F140_BILL_CHA_01
SAP09 Internal documents RFKORD30 Document number F140_INT_DOCU_01
SAP10 Individual letters RFKORD40 Account number F140_IND_TEXT_01
SAP11 Document extracts RFKORD50 Document number F140_DOCU_EXC_01
SAP13 Customer statements RFKORD11 Customer number and date F140_CUS_STAT_01

Correspondence Configuration in SAP


Step 1: Define Correspondence Type

IMG Path: – SPRO > Financial Accounting (New) > Accounts Receivable and Accounts Payable > Customer Accounts > Line Items > Correspondence > Make and Check Settings for Correspondence > Define Correspondence Types Transaction Code:-OB77 Here various SAP standard correspondence types are available. You can also create your custom correspondence types. You can specify that what data is required for generating a correspondence, e.g. for account statement you can specify that customer/ vendor master is necessary for the statement. Correspondence Type    

Step 2: Assign Program to Correspondence Type

IMG Path:-SPRO > Financial Accounting (New) > Accounts Receivable and Accounts Payable > Customer Accounts > Line Items > Correspondence > Make and Check Settings for Correspondence > Assign Programs for Correspondence Types Transaction Code: –OB78 Assign Program to Correspondence Type Here you need to link the correspondence generator program to the correspondence type. You can also specify different programs for different company codes. (Also, you can specify the default variant here for the program to execute. You can create such variant from transaction SE38SA38 for the program.) You can also create your own custom program as a copy of the standard program and can make suitable changes to meet any of your client specific need
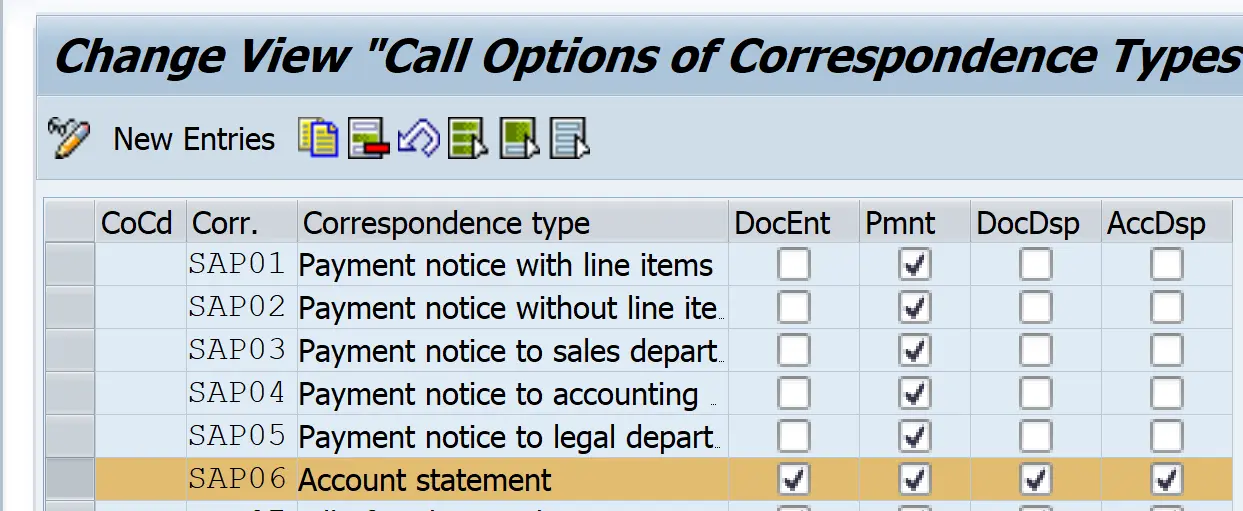
Step 3 :  Determine Call-Up Functions for Correspondence Type

Path:-SPRO > Financial Accounting (New) > Accounts Receivable and Accounts Payable > Customer Accounts > Line Items > Correspondence > Make and Check Settings for Correspondence > Determine Call-Up Functions Transaction Code:-OB79 Determine Call-Up Functions for Correspondence Type Here you need to specify that at what point of time you can generate the particular correspondence type.  The various options available are:-

  • At the time of document entry (e.g. FB50, FB60, etc.)
  • At the time of posting payments (e.g. F-28, F-26, etc.)
  • At the time of document display or change (e.g. FB02, FB03, etc.)
  • At the time of account display (e.g. FBL1N, FBL5N, etc.)


Step 4 : Assign Correspondence Form to Correspondence Print Program

Path:-SPRO > Financial Accounting (New) > Accounts Receivable and Accounts Payable > Customer Accounts > Line Items Correspondence > Make and Check Settings for Correspondence > Define Form Names for Correspondence Print Transaction Code: –OB96 Assign Correspondence Form to Correspondence Print Program Here you need to specify that which forms definition will be used by the correspondence print program. You can also specify a different setting for different company codes. (The SAP Script form is defined using the transaction SE71, where the various data is arranged in the output format to get processed.) You can also use two digit form IDs, by which you can call different forms for different form IDs in the same company code. This form ID can be given in the selection screen of the print program generating correspondence.
Step 5 : Define Sender Details for Correspondence

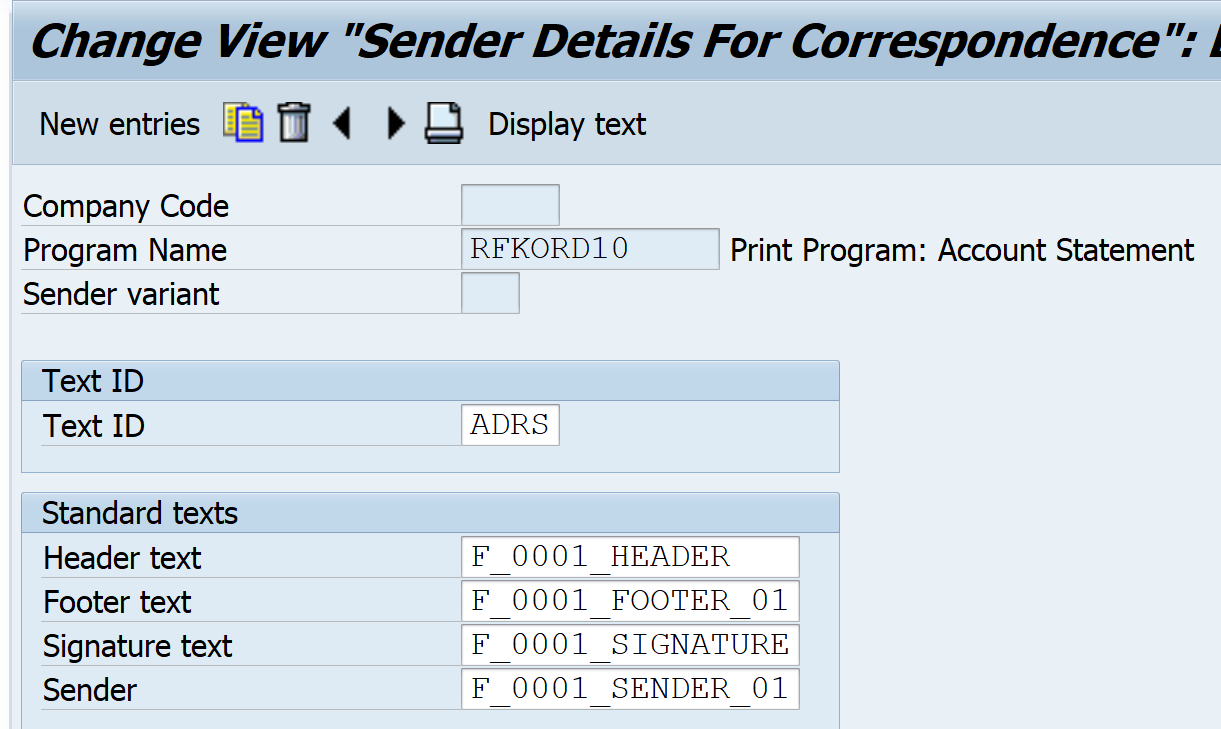
Path:-SPRO > Financial Accounting (New) > Accounts Receivable and Accounts Payable > Customer Accounts > Line Items > Correspondence > Make and Check Settings for Correspondence > Define Sender Details for Correspondence Form Transaction Code:-OBB1 Define Sender Details for Correspondence

  • Here we can link the details for header, footer, signature and sender. This text is defined using the transaction code SO10 with text ID as linked above (e.g. ADRS).
  • We can also specify a different setting for different company codes.
  • Here we can also define two digit sender variant, which we can give to the selection parameters of the print program. This will enable different sender details within same company code.

Step 6 : Define Sort Variants for Correspondence

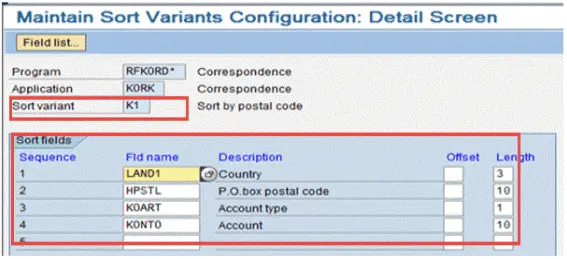
Path:-SPRO > Financial Accounting (New) > Accounts Receivable and Accounts Payable > Customer Accounts > Line Items > Correspondence > Make and Check Settings for Correspondence > Define Sort Variants for Correspondence Transaction Code: –O7S4 Define Sort Variants for Correspondence You can specify in which order the correspondence letters will get generated. E.g. if you are generating account statement for multiple vendors, then vendors will get sorted in this order and then the letter will get generated. This Sort Variant can be given in the selection screen of the print program generating correspondence.   
Step 7 :  Define Sort Variants for Line Items in Correspondence

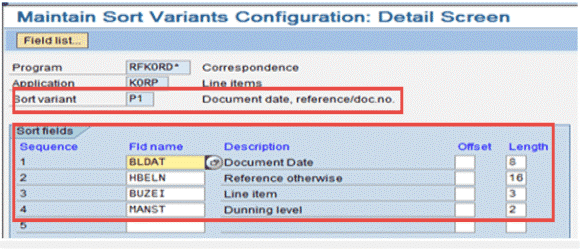
Path:-SPRO > Financial Accounting (New) > Accounts Receivable and Accounts Payable > Customer Accounts > Line Items > Correspondence > Make and Check Settings for Correspondence > Define Sort Variants for Line Items Transaction Code: –O7S6 Define Sort Variants for Line Items in Correspondence You can specify that in which order the various line items will appear in a correspondence letters. E.g. if a vendor account statement has multiple invoices, then invoices will get sorted in this order and then the letter will get generated. This Sort Variant can be given in the selection screen of the print program generating correspondence.
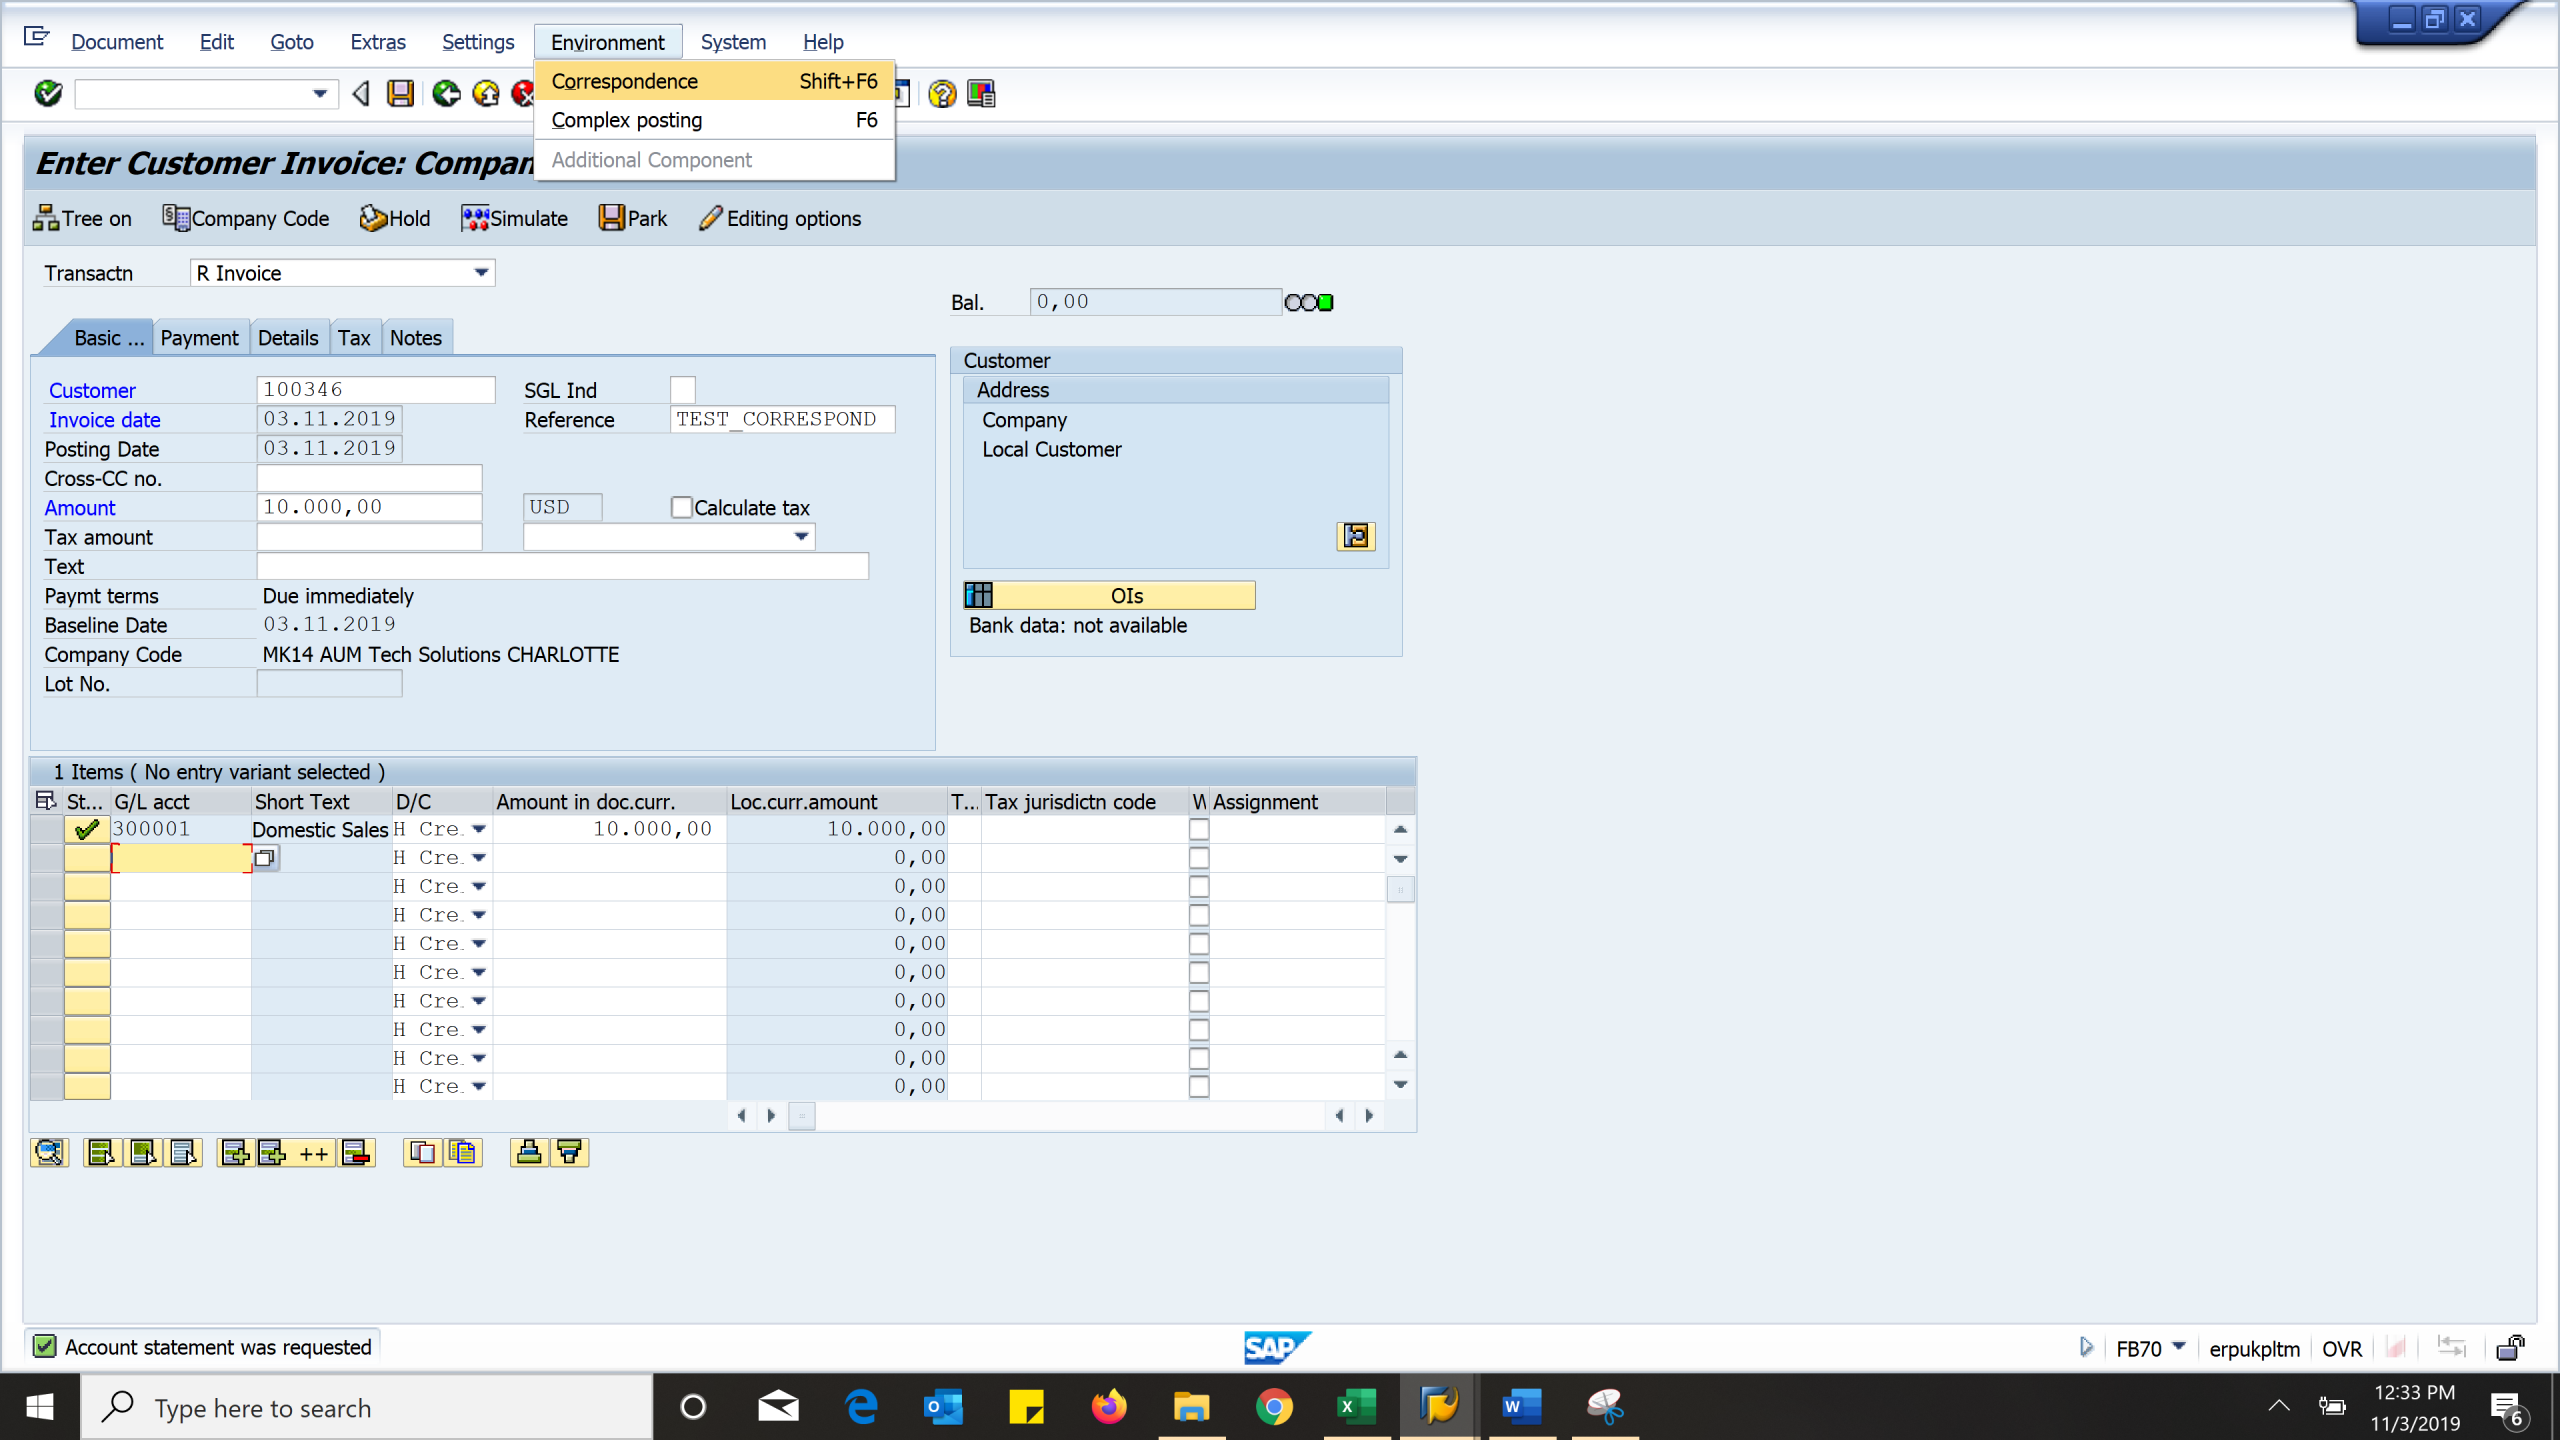
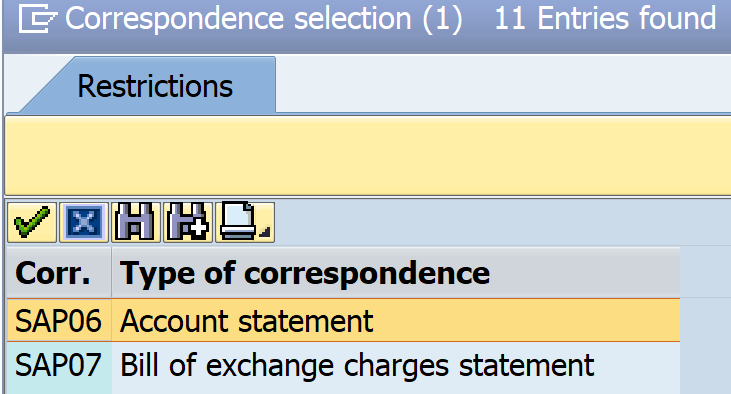
 

Correspondence Generation and Printing

Correspondence can be generated at below times:

  • At the time of document entry (e.g. FB50, FB60, etc.)
  • At the time of posting payments (e.g. F-28, F-26, etc.)
  • At the time of document display or change (e.g. FB02, FB03, etc.)
  • At the time of account display (e.g. FBL1N, FBL5N, etc.)


Correspondence Generation (Method A)

The correspondence can be generated while you create, change or display the document. Path:  Environment > Correspondence and select relevant correspondence type, e.g.  below screen in FB70 customer invoice creation:- Correspondence Generation Correspondence Generation Similarly correspondence can be generated from document display/ change from the transaction, like in FB02/ FB03/ FLB5N, etc.      
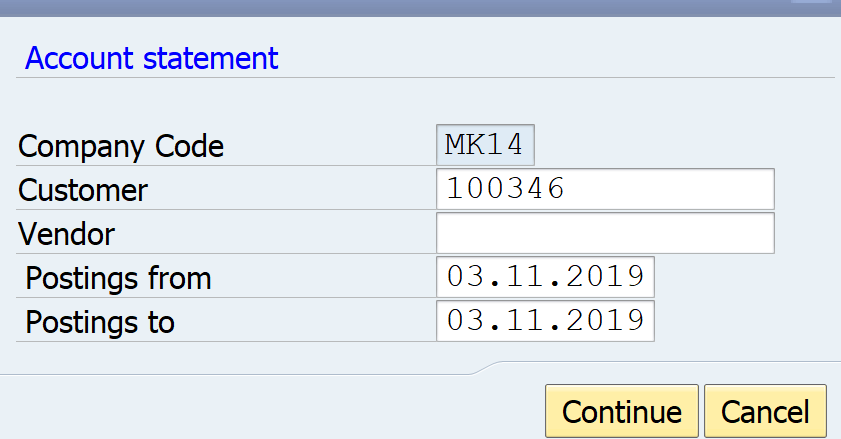
Correspondence Generation (Method B)

For existing accounting documents you can use transaction code FB12. Enter company code, Customer number, Posting date etc. as shown below. After that correspondence is requested Correspondence Generation   

Correspondence Generation (Method C)

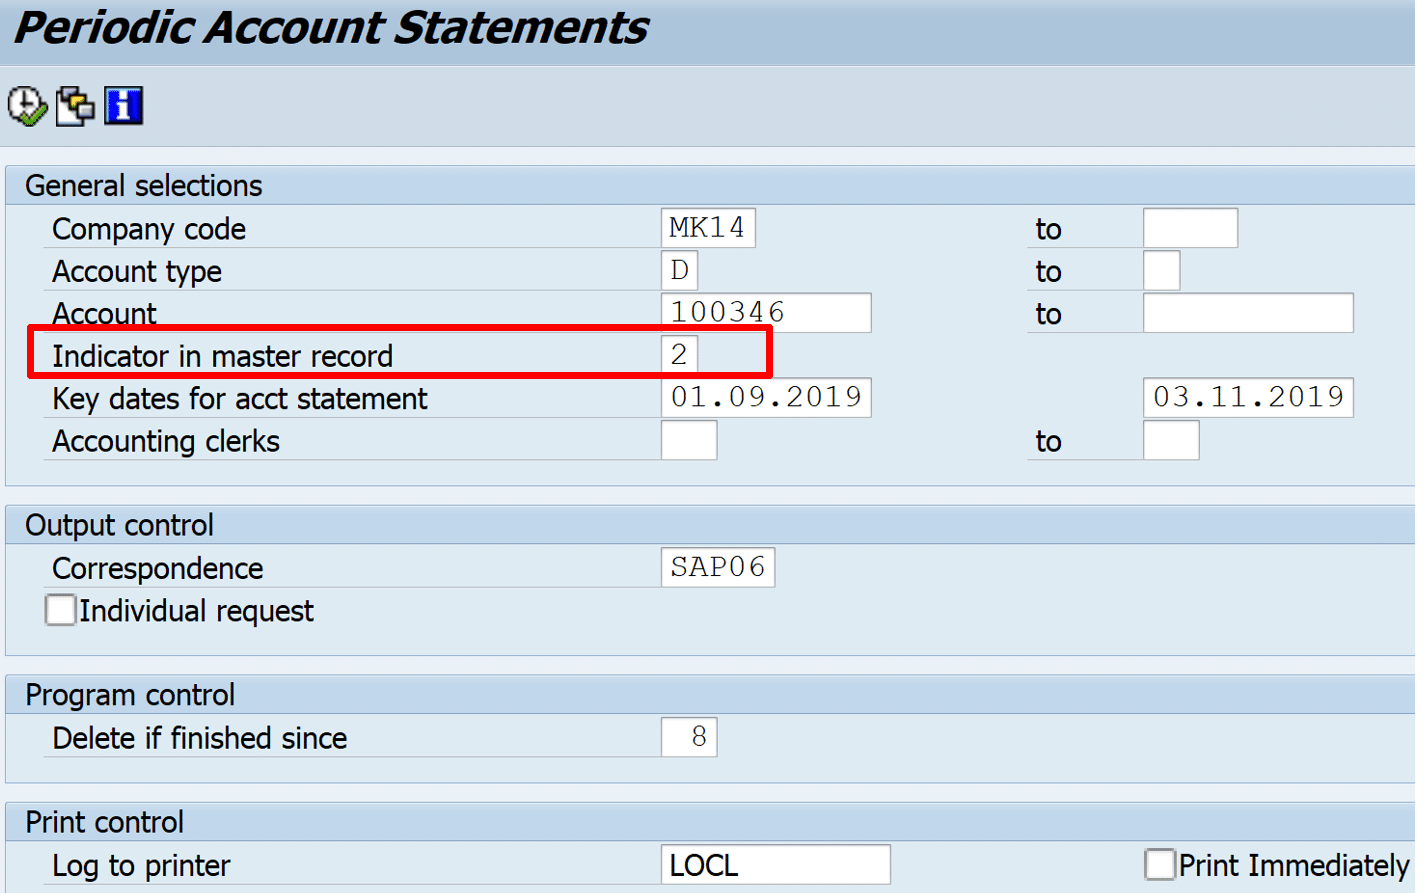
From transaction F.27, you can generate the correspondence (Account Statement) for vendor(s) / customer(s). Correspondence Generation Here “Indicator in Master Record”, the value given should match with the value given in customer/ vendor master data > Company Code > Correspondence.
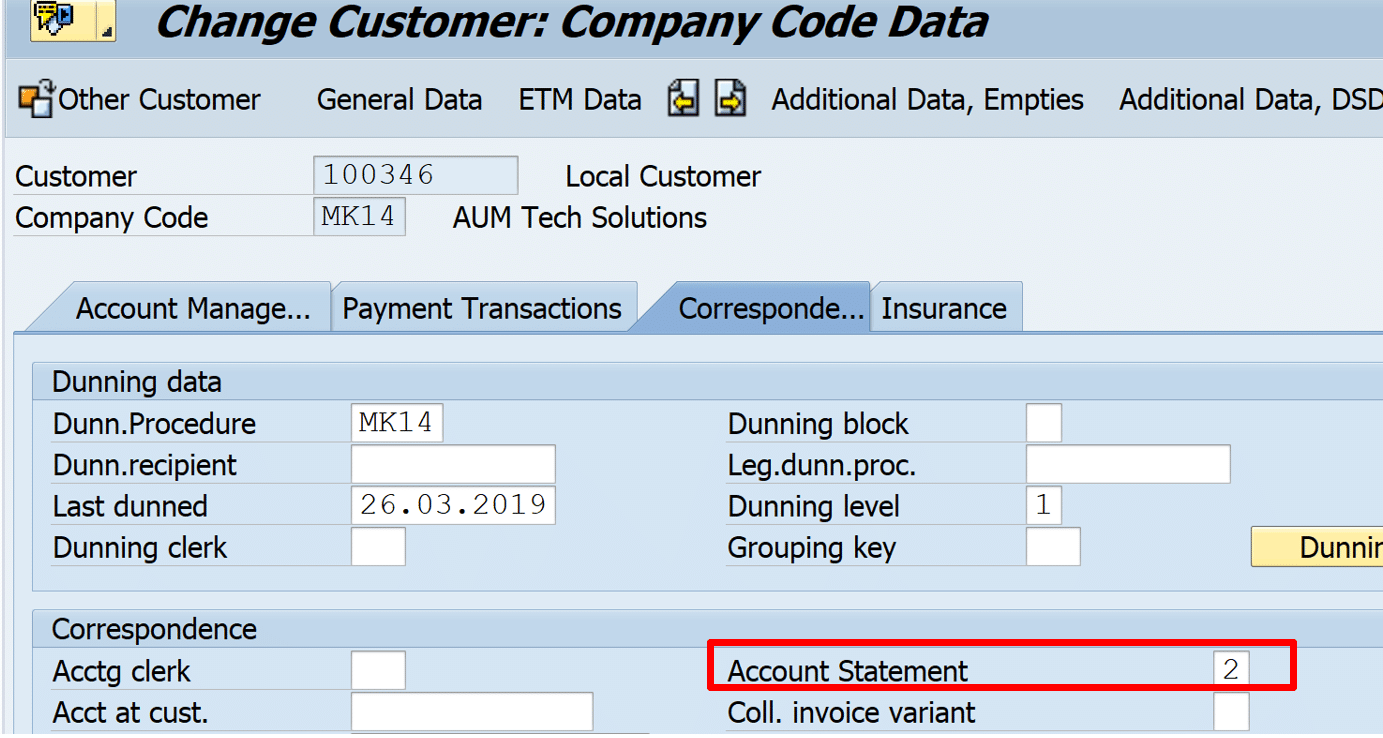
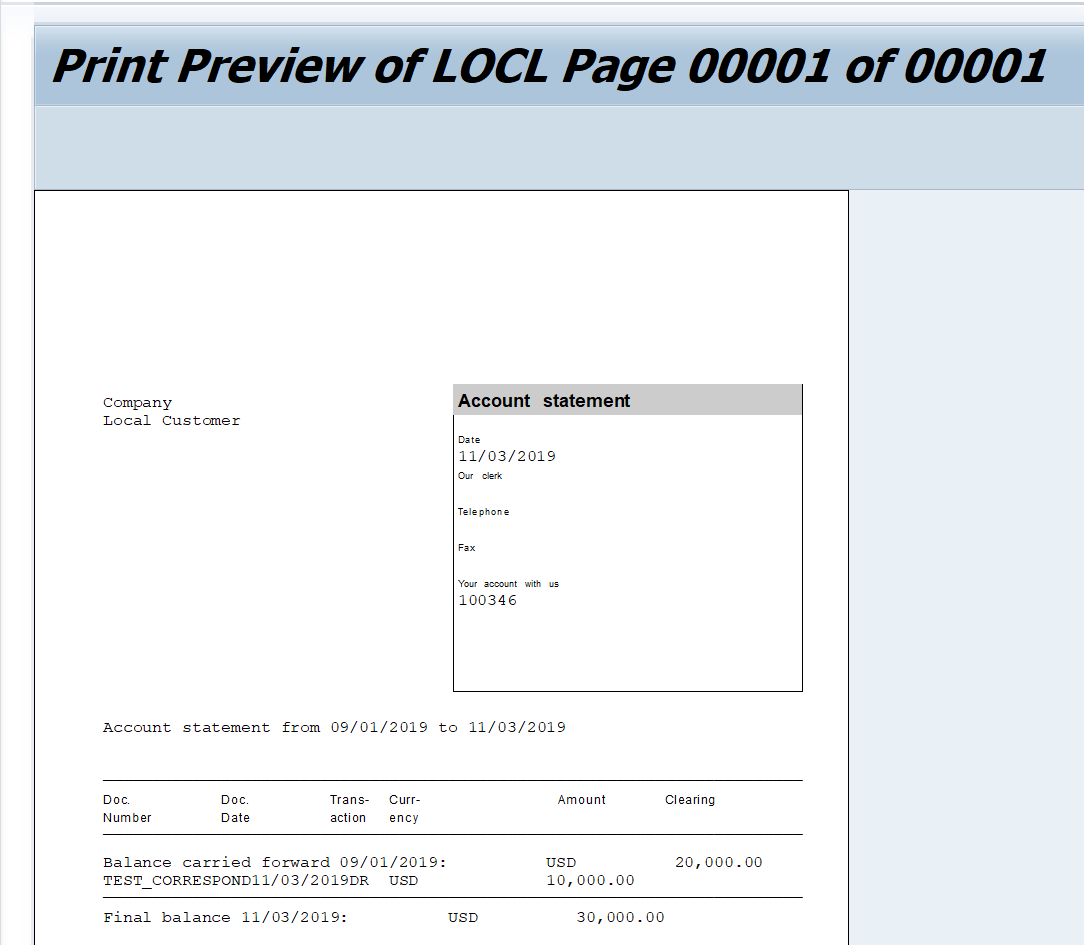
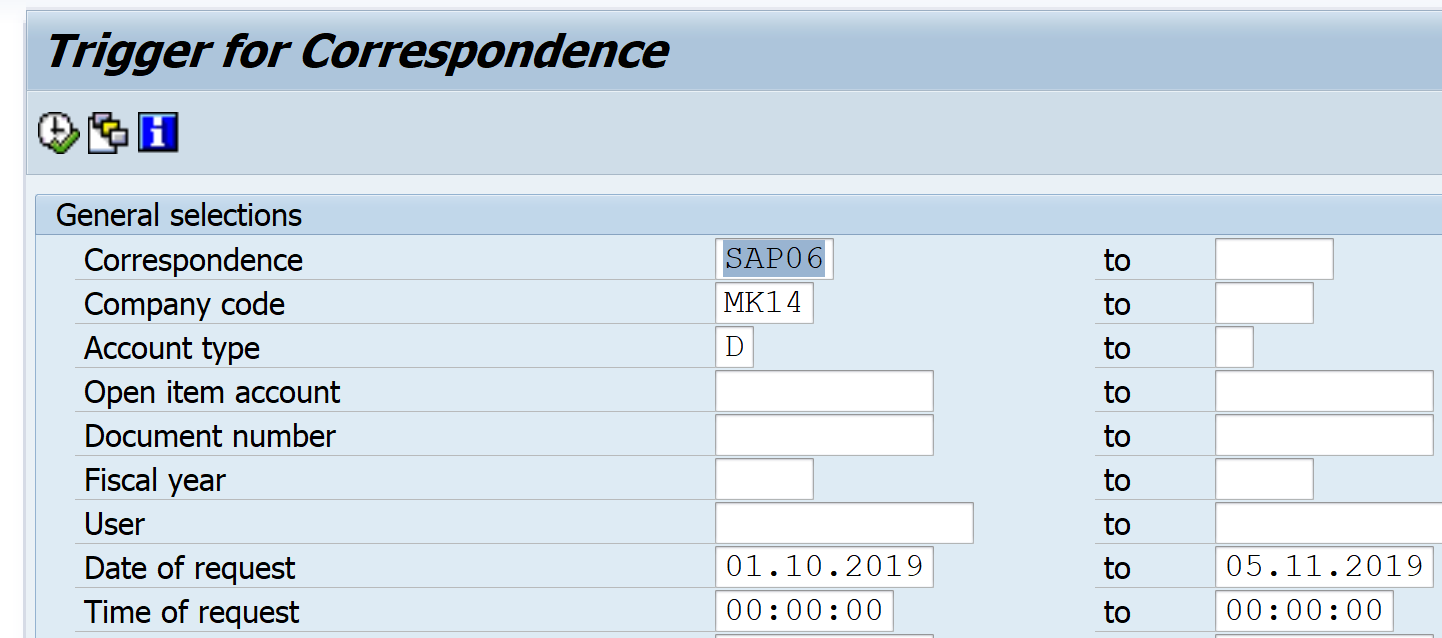
Update customer master with correspondence indicator : XD02

customer master with correspondence indicator


Display the spool (Correspondence letter generated) : SP01

Display the spool (Correspondence letter generated) Correspondence Printing Transaction code : F.61 Correspondence request generated in transactions FB12 and FB70 will be printed here Correspondence Printing

Display the correspondence generated/Spool in Transaction code : SP01 Correspondence Spool in Transaction code : SP01


Interest calculation on customer past due invoices in SAP

This functionality calculates interest at the specified rate ( in SAP configuration) interest on customer invoices past due and Invoices paid after due date. This interest is debited to customer account and credited to interest received account. Program can also create a correspondence with details of past due customer invoices, interest amount on these invoices. This it can send automatically to customer through various means like email etc.

  1. Define Interest calculation types
  2. Prepare Item interest calculation
  3. Define Reference interest rates
  4. Enter interest values
  5. Define time-based terms
  6. Calculation of interest on arrears
  7. Assign interest indicator in customer master
  8. Calculate and Post interest on customer past due invoices


Define Interest Calculation Types in SAP

Path: SPRO – FA – AR/AP – Business Transactions – Interest Calculation – Interest Calculation Global Settings – Define Interest Calculation Types

Here we define the interest indicator. This has to maintain in customer master on whom interest has to be calculated.

Interest Calculation Types:

  • P: Calculate interest on invoice line item
  • S: Calculate interest on customer account balance

Define interest calculation type


Prepare Item interest Calculation in SAP

Path: SPRO – FA – AR/AP – Business Transactions – Interest Calculation Global settings –Prepare Item interest calculation

Here make general settings for item interest calculation:

  • Select interest calculated: Open Invoices due for payment, Cleared invoices after due date
  • Reference date: Date with reference to which interest on overdue invoices is calculated.
  • No Interest payment: Interest is calculated on items paid before due date (Credit interest) and items paid after due date (Debit interest). If you do not want credit interest to be credited to customer account, select this check box
  • Post Interest: Select to post interest to customer account
  • Posting with Invoice Reference: If you have set this indicator, the interest receivables created are posted with reference to the invoice for which interest was calculated.

Prepare item interest calculation on customer invoices


Define Reference interest rates

Path: SPRO – FA – AR/AP – Business Transactions – Interest Calculation – Interest calculation – Define reference interest rates

Here you maintain interest rate for which interest rate percentage is maintained later in the configuration. This percentage is used to calculate interest amount

Define reference interest rates on customer invoices


Enter Interest value

Path: SPRO – Financial Accounting – AR/AP – Business Transactions – Interest Calculation – Interest calculation- Enter interest value

Enter interest rate for customer overdue invoices


Define Time Based Terms

Path: SPRO – FA – AR/AP – BT – Interest Calculation – Interest calculation- Define Time based terms

In this activity, you specify how the system determines an interest rate for each interest indicator.

  • Specify a reference interest rate for which the interest rate is defined.
  • Specify the required interest rate directly in the Premium field without specifying a reference interest rate.
  • Specify a reference interest rate and an interest rate in the Premium field. The interest premium is added to the reference interest rate during interest calculation.

Define time based terms for customer past due invoices


Calculation of Interest on arrears

Path: SPRO – Financial Accounting – AR/AP – Business Transactions – Interest Calculation – Interest Posting – A/R: Calculation of interest on arrears

In this step, you define the specifications for posting the interest calculated as interest on arrears.

The account determination is carried out via the posting interface of application 0002.

Define Interest calculation on customer past due invoices

Account determination keys and posting details

For the business transaction account determination key, 1000 (interest earned) and 2000(interest paid) should be entered.

For every combination of the account determination keys, you specify a debit-posting key, a credit posting key and account symbols (posting details). You use the account symbol 1000 for the customer posting.

GL Accounts

Assign GL accounts for interest received from customers

G/L accounts: For each G/L account symbol, you specify the account allocation for interest earned and interest paid in full.


Create Account symbols


Assign Interest indicator in customer master

Tcode: XD02

Assign Interest indicator in customer master


Assign forms to print interest calculation

Path: SPRO – Financial Accounting – AR/AP – Business Transactions – Interest Calculation – Print 

Assign smart form to print interest calculation


Calculate and Post interest for customer overdue items

Transaction code: FINT

Calculate and Post interest for customer overdue items

Interest document posted: FB03

Calculate and Post interest for customer overdue items


SAP Online Courses

For detailed, step-by-step instructions on SAP Lockbox follow along with my video tutorial below


SAP Dunning

Purpose 

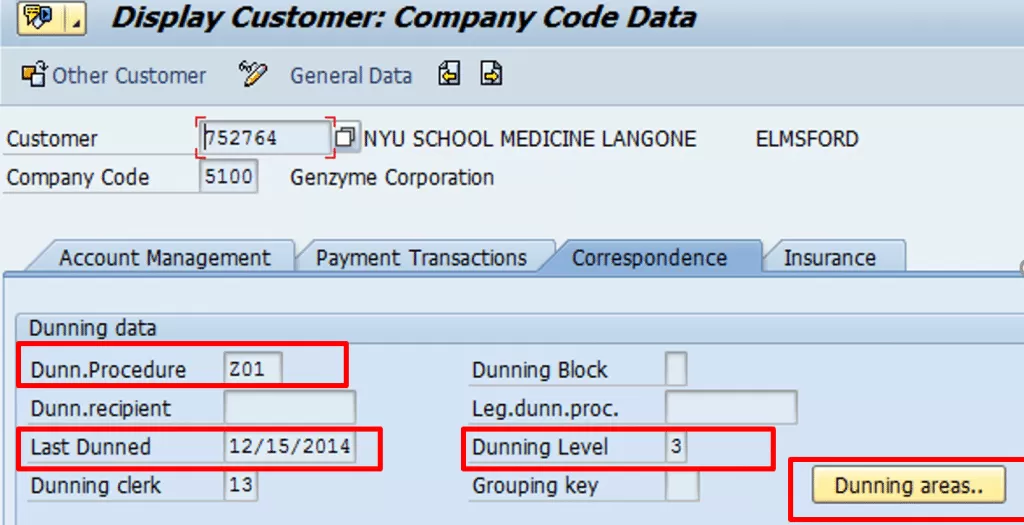
When the customer misses the payment for the outstanding invoice within specified payment due date. The dunning letter is generated via sap program and sent to customer address / email as reminder of outstanding payment.  

The dunning system covers the following documents

SAP Accounts Receivable Read More »

error: Content is protected !!